
Under the Scope: Common Laser Welding Pitfalls
Four key trouble areas that can negatively impact efficient and effective laser welding are communication, removal of air pockets, edge technique and selection of filler rod size.
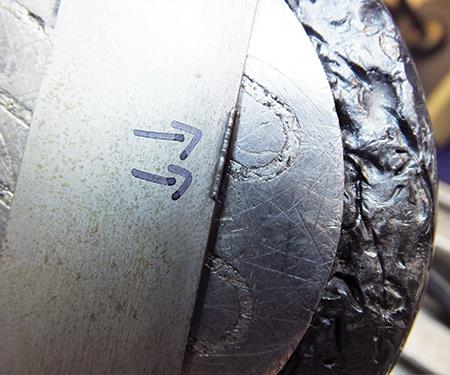
The “bump” technique in micro-TIG welding involves slightly decreasing the amperage when reaching the end of the damaged edge and gently pushing in filler rod to bump over the end of the edge. Images courtesy of Toolweld Inc.
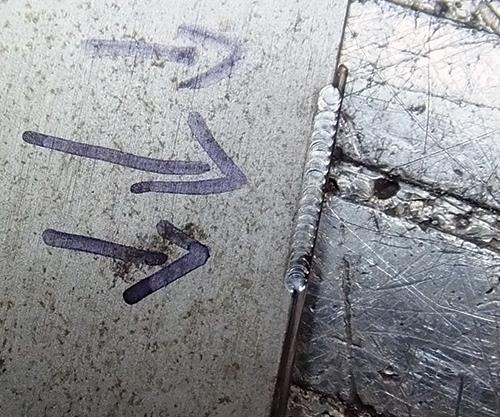
In the “attached rod” laser welding technique for repairing an edge, a filler rod is placed along the edge and slightly below the damaged area.
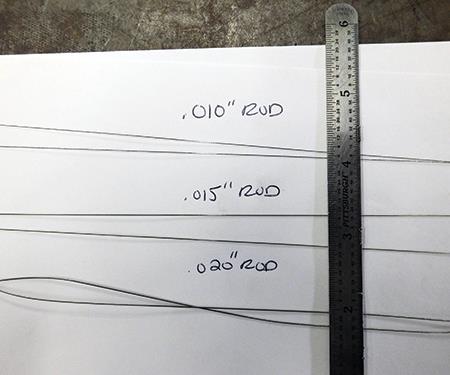
Recommended filler rod diameters for laser welding are 0.010, 0.015 and 0.020 inch, because these sizes offer the ideal balance of small diameter and filler bulk for weld repairs.


Inexperienced laser welders must learn the basics of mold-repair welding, machine operation and effective communication to avoid the challenges and dangers associated with laser welding. Here, we’ll focus on four key trouble areas that can negatively impact efficient and effective laser welding: communication, removal of air pockets, edge technique and selection of filler rod size.
Communication. When a welder fails to repair a mold, the most likely cause is a lack of communication between welder and customer. Proper communication is the most crucial step in any mold repair, and it always involves two sides that must completely understand each other. Because different people tend to mark jobs differently, a short description of the areas that require welding along with the sketch of the damage is an example of effective communication. For example, I asked a customer to mark up the areas to be welded for a particular job. It seemed simple enough. I did the job according to what I assumed the customer wanted. To my dismay, I finished the job and returned it to the customer only to discover that he had marked the areas he did not want welded! The lesson: Always ask questions and verify instructions.


Removal of air pockets. The most commonly used laser welder for mold repair is Nd: YAG (neodymium-doped yttrium aluminum garnet), a crystal that is used as a lasing medium for solid-state lasers. Welding power is delivered from the focus head to the workpiece by pulse or continuous wave, although pulse lasers are preferred because they use less energy and therefore produce less heat. This is why molds that are pulse-laser welded rarely get hot, or even warm. In a pulsed-laser setup, the laser light is disturbed in controlled bursts generated from the flash lamp and reflected by mirrors from the focus head to the workpiece.
In addition to using a pulsed laser, most laser welds for molds are deposited on the workpiece in conduction mode, in which the heat of the laser conducts with the metal surface and produces wide and shallow welds with minimal penetration in the base material. Obviously, this method is optimal for producing welds with little heat, but it also increases porosity, or air pockets, due to the minimal surface penetration and incomplete distribution of filler material between individual weld beads.
There are two techniques for reducing porosity problems. One increases the laser machine’s power and the amount of time it pulses (called pulse width) to achieve more penetration in the base material. However, this is time-consuming, adds more heat to the process and can increase the chance of weld splatter affecting the area around the weld. A more effective process is called smoothing and is used after a weld is completed with filler material. The welder increases power along with pulse width and re-welds over the previous weld on pulse only (without filler material) in an attempt to knock out any air pockets that might have formed in the weld bead. A smoothing pass is then performed in the opposite direction to further knock out remaining air pockets. Smoothing passes are essential for all laser welding repairs, especially in large welding buildups. Neglecting to use them will increase the chances of porosity and uneven welds.
Edge technique. Welding edges was my biggest source of frustration when I first started micro-TIG welding. It seemed that no matter what I did, I always burned away the sharp edge where the weld met the base steel, leaving an undercut. To combat this problem, I use what I call the “bump” technique, in which I slightly decrease the amperage when I reach the end of the damaged edge and gently push in the filler rod to bump over the end of the edge. The objective is to create enough melt for the excess filler rod to melt into the damaged area and the sharp edge, but not enough melt to create an undercut. This micro-TIG welding process takes time to learn to do correctly, but it is the proper way to weld an entire edge from start to finish.
Another technique for edge repair is what I call the “attached rod” technique. The welder places a filler rod (0.015- to 0.020-inch) along the edge and slightly below the damaged area, then welds in pulse-only mode (without filler) along this area, melting the rod and edge. While on pulse, the welder should stay slightly away from both ends of the attached filler rod. After attaching the filler rod, another, smaller diameter filler rod is used to weld over the melted attached filler rod and the edge. This fills the damage area. Laser welding over the unwelded gap at the ends of the attached filler rod does not create an undercut when done properly. When the procedure is complete, the welder carefully snaps off the unwelded attached filler rod.
This attached rod technique works, but is impractical for small, deep edges and details. In those instances, I recommend applying the bump edge technique for TIG welding.
Selection of filler rod size. Choosing a filler rod that is too small for the job is a common mistake, especially for first-time laser welders, because they assume a small-diameter filler rod will produce smaller welds. It’s necessary to use a smaller diameter rod to make a small weld repair, but welders should keep in mind that what I call “filler material bulk” is needed to ensure an optimum weld spread is achieved. For example, when repairing an area the size and thickness of a nickel, the welder should not use 0.005-inch filler, because it will not create enough bulk to spread efficiently during welding. Recommended filler rod diameters for most laser welding are 0.010, 0.015 and 0.020 inch. These sizes provide the perfect balance of small diameter and filler bulk for weld repairs.
When I laser weld, I increase the power on my machine and adjust the pulse width, creating a puddle that flows and spreads evenly on each pulse. With practice and experience, any welder can learn how to manipulate the flow of a pulsed weld puddle to fill larger areas. Practicing the techniques described here will help welders adjust to the intricacies of mold laser welding.


Related Content

Hands-on Workshop Teaches Mold Maintenance Process
Intensive workshop teaches the process of mold maintenance to help put an end to the firefighting culture of many toolrooms.
Read More
MoldMaking Technology's Most-Viewed Content 2022: Products
MMT shares the five top-viewed technologies, equipment and services of 2022 in each Engineer, Build, Maintain and Manage tenet based on Google Analytics.
Read More
Questions and Considerations Before Sending Your Mold Out for Service
Communication is essential for proper polishing, hot runner manifold cleaning, mold repair, laser engraving and laser welding services.
Read More
Products and Services for Multiple Moldmaking Needs
New year, new technology roundup! Featured here is a collection of product offerings, from profile milling cutters to industry-specific CAD/CAM software to innovative hot work tool steels.
Read MoreRead Next

Are You a Moldmaker Considering 3D Printing? Consider the 3D Printing Workshop at NPE2024
Presentations will cover 3D printing for mold tooling, material innovation, product development, bridge production and full-scale, high-volume additive manufacturing.
Read More
How to Use Continuing Education to Remain Competitive in Moldmaking
Continued training helps moldmakers make tooling decisions and properly use the latest cutting tool to efficiently machine high-quality molds.
Read More
Reasons to Use Fiber Lasers for Mold Cleaning
Fiber lasers offer a simplicity, speed, control and portability, minimizing mold cleaning risks.
Read More