
Texturing Molds for Thermoplastics: Factors for Success
Factors to consider when selecting a texture or grain for a thermoplastic mold or die.


Every day brings us in contact with plastic parts having a huge array of looks and feels that are due to the surface structure or texture of those parts. Texturing—sometimes referred to as graining or engraving—is the process of adding a pattern (the texture or grain) to the molding surface of a mold. This allows the mold to impress that pattern on each molded part. Compared to finishing each molded product, texturing or graining of a mold is a very economical way to impress complex designs or patterns on molded plastic parts. The accurate reproduction of the specified texture in the mold surface requires careful consideration of many factors.
The types of texturing we’ll review here are chemical-etch textures. The texture or grain is created in the steel by a systematic application of an etchant. Basically, it is a controlled-corrosion process. Most issues that come up with texturing can be traced back to the influence of some parameter on the corrosion process.
Materials
Etchants: The texturing of most thermoplastic mold materials—including carbon steel, stainless steel, aluminums, coppers, bronzes, etc.—is often done with one of two chemical etchants: ferric chloride (FeCl3) or nitric acid (HNO3). Defining the area of the mold to be chemically etched is done by masking off or protecting the areas you don’t want to texture from etchant. Anything that resists the corrosive effects of the etchant and handling of the block during processing can be used. Most often used are vinyl tapes and waxes, asphaltum or other mastics that can be easily applied by hand with paint brushes. The tapes can be used to cover the broad areas and holes. The paintable mastics are used for the details.
Etching aluminum: Aluminum can be textured like steel, but does not corrode the same. Aluminum actually reacts more quickly in these etchants, thereby leaving less room for error. In addition, the chemical reaction taking place when etching aluminum is exothermic, meaning heat is produced during the process. The heat given off during the process will heat up the etchant bath, thereby further speeding up the corrosion activity. The etchant solution temperature needs to be monitored and controlled where necessary. Foundry-cast aluminums—like those used in some inexpensive blow mold tools as opposed to the wrought alloys—react at about the same rate, but react differently. Porosity is an issue because those pores are exposed and often are deeper and more pronounced than the texture pattern applied. Those cases require blocking—or surface coating—the molding surface first. In general, the same texture applied to aluminum will not be as crisp as with steel.
Etching stainless steel: Stainless steel is naturally more resistant to corrosion due to the content of Cr and Ni. Stainless steel, by definition, is steel with about 11.5% Cr or greater. At that Cr content, the exposed surface of the alloy has enough tenacious Cr oxide to prevent the iron from oxidizing and the alloy therefore “stains less”. Austenitic stainless steels (like the AISI 300 series) present difficulties due to the high Cr content in addition to the high Ni content—two alloying elements that improve corrosion resistance. The martensitic AISI 420 is easier to texture. Molds made from 420SS are often hardened, which affects corrosion resistance and therefore the ability to take a texture as well. Corrosion resistance increases with hardness, and therefore, a 420SS block at Rc 52/54 will take longer than a block at Rc 40.
Effects of hard-milled surfaces: Hard milling has come along way in the last 10 years. But, more so than other milling processes, hard milling leaves a surface with greater work hardening. Due to the variable cutter path over the entire surface and the nature of the programming and cutting, it is not a uniform hardness. Work-hardened surfaces have different molecular structures from the parent steel and that affects corrosion resistance. This non-uniform hardness yields non-uniform corrosion resistance that leads to a non-uniform texture. This is why the hard-milled, work-hardened surfaces need to be polished out.
Methods
Applying the mastics to the areas needing to be kept free of etchant is done with a variety of brushes. These are typically small paint brushes. This is important to remember when defining crisp or very small transitions between areas to be etched and areas kept free of etching. Someone will need to get in there and apply tape or paint mastic in there (see Figure 1 a,b,c).
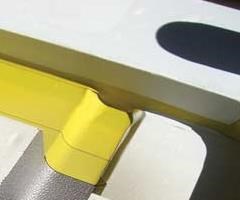
Figure 1 a These three pictures show various ways of masking off everything on the mold surface that is not to be etched. Vinyl tape, mastic, caulk, etc. can all be used in various ways.
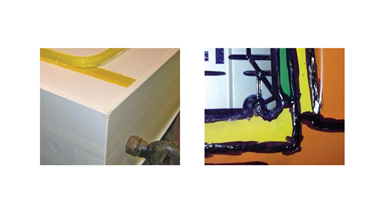
Figure 1b (left), Figure 1c (right)
Flow and dunk methods: There are two basic methods of exposing the mold to the etchant: flow and dunk. The flow method is basically orienting the mold so most or all of the surface to be etched can shed the applied liquid, then spraying or otherwise applying the etchant to the surface. It is generally used only when the block is too big for the tank or a tank is not available in which to dunk the mold.
The dunk method is just as it sounds: simply dunking or immersing the entire block into the etchant bath. Molds—such as large blocks of aluminum—can be a challenge with the flow method because the aluminum may etch as it’s flowing down the mold face. The dunk method is easier to control and therefore provides a more even etch. The only real limitation to using the dunk method is the tank size and the mold block handling equipment.
Laser etching can be done as well. This is when a pattern is cut through an applied resist before the bath. Then a new resist is applied and etched to give it more depth. The result is multilayered contours instead of the uniform mounds.
Surface preparation: While different textures sometimes require the mold surface to be brought up to a certain finish prior to texturing, a safe finish is a SPI B3 320 paper. Bear in mind that patterns 0.001” deep will show cutter marks. If you are unsure of a texture’s depth, consult your texture house or refer to one of the books and note the default depth for each texture.
Replicating unknown textures: Occasionally an opportunity comes up to replicate an existing, unknown texture in a new mold. This is where an experienced master patternmaker comes in and uses their experience to match an unknown texture.
Supplementary processes: There is a process called round off, which is an open etch. If the texture seems to have too much of an edge, the round off process breaks the surfaces. The process consists of stripping all the resist—or mastic—off the textured area and dunk for a limited time.
Texture depths and draft: Each standard texture has a default depth. If you specify a texture without a depth callout, the texture house will use the default depth. A good rule-of-thumb for draft is to add a minimum of one degree per side for every 0.001” of texture depth. Below that you run the risk of drag marks. If the part design is such that you cannot afford the extra draft a texture requires, consider blending the texture depth to less than the standard.
EDM or Chemical Etch?
Occasionally the molded product just needs a matte finish like that left from EDM, and the question arises: Should the EDM finish be left alone or should it be taken off and a chemical etch be applied? Cost is a factor, as is the overall visual quality. If the part is small and the uniformity of the finish either is not important or will not be readily discernable (maybe due to the color of the molded product, etc.), it can be more economical to leave the EDM finish.
If the EDM surface ever needs to be repaired, it is very hard to do with chemical etching. The EDM process leaves a white layer (or recast layer) that is a chemically-altered state of the parent metal, and is not etchable and needs to be removed to get to the parent steel. This layer is not entirely uniform and therefore will not corrode uniformly in the presence of an etchant. In addition, this white layer typically will not accept any surface treatment like plating or nitriding. If you think the surface will need to be repaired at some point, it is better to chemically etch it and not leave an EDM finish.
Economics
While there are many factors driving the cost of the texture, a reasonable ballpark budget for texturing is 2 to 3 percent of the total mold cost.
Complexity: Complexity of the mold will certainly affect the cost. Components such as cams, slides, lifters, inserts that might require masking or selective texturing all require time to prepare. Dissimilar metals—particularly when placed next to each other in a mold—create difficulty due to the different etch rates. Again, think about each metal’s unique resistance to corrosion.
Size: The total size of tooling will, of course, play a role. A 500-pound block will be less expensive than a 10,000-pound block due to preparation and handling. In addition, the amount of masking materials is less and if a multi-layer pattern is applied, the square area requiring texturing will drive the number of pattern sheets needing to be purchased. Multi-layer patterns are the ones that tend to look more real. They are often one or more patterns laid over each other.
Mold types: Thermoforming and blow molds can be less expensive to texture compared to injection molds. Thermoform molds and blow molds by the nature of their lower pressures don’t replicate the mold pattern as precisely. In other words, what will show up in an injection molded part will not show up in a thermoformed or blow-molded part. The result is you can get away with patterns that are less clear.
One issue that can offset some of the texture savings on thermoforming and blow molds is preparing the vents or vacuum holes. These holes add time to the preparation because you have to plug and un-plug the holes before and after the process. If a tool does not need to be sampled prior to texture, then it is more economical to texture the mold first then add the vacuum holes or vents.
Pattern selection: Patterns referred to as spray patterns are the least expensive. They get their name because of the way the resist is applied to the surface to be textured—with a sprayer. Transfer, or multi-layer, patterns require more work and the patterns are transferred to the metal from sheets. Multi-layer patterns are achieved by iterating a transfer etching process. Transfer patterns may require touching up areas by hand where the sheets blend together. Multi-layer patterns might require handwork between each transfer (see Figures 2 a,b,c,d).
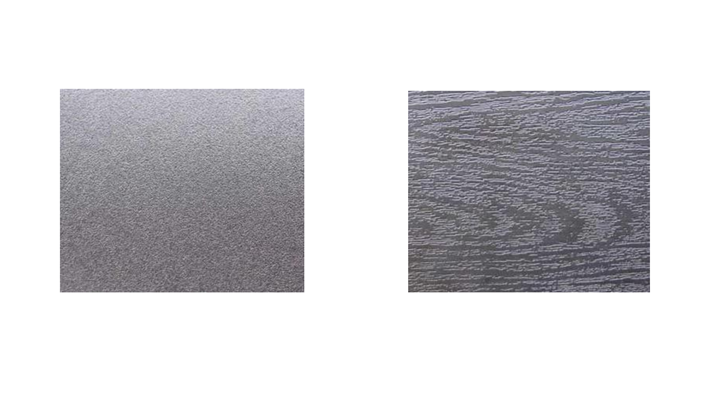
Figure 2a (left) Here is an example of a spray pattern where the resist is applied with a spray gun. Spray patterns closely resemble EDM finishes.
Figure 2b (right) This wood grain is an example of transfer patterns where the resist is transferred from sheets with that pattern.
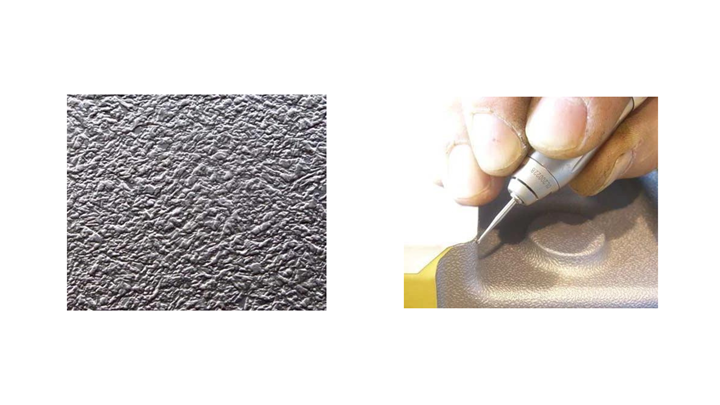
Figure 2c (left) This texture has grain with varying depth, achieved through multiple transfer and etchant applications. These are more expensive and time-consuming.
Figure 2d (right) Some transfer patterns require hand-blending, particularly in the corners and edges where the pattern might not otherwise meet perfectly. If you picture trying to wrap a flat sheet with this pattern around these contours, you can imagine some of the skills required to blend everything together.
Mold preparation: The condition of the mold when it arrives to be textured will influence the cost. Cutter marks and EDM all need to get polished out. Cutter marks: because the surface undulations might show through and because the surface of the cut may be work-hardened. EDM: because the re-cast white layer reacts completely differently than the parent steel.
Welded areas: can be particularly difficult if the proper pre-heat and post-heats were done when welding. The pre-heats and post-heats are done to create a uniform molecular structure, which provides a uniform reaction to the etchant. The process of making a uniform heat-affected zone in the weld area is often referred to as color matching. In general, the welding needs to occur above the martensitic transformation zone. Very roughly speaking, hardening is the controlled transformation of austenite to martensite and the huge thermal gradients in a non-preheated weld zone (molten steel to cold steel within a short distance) creates different molecular structures that corrode or etch differently. The term color matching is used, which is basically the vacuum tempering of the steel to bring it back to a uniform and more stable molecular structure (See Figure 3 a,b).
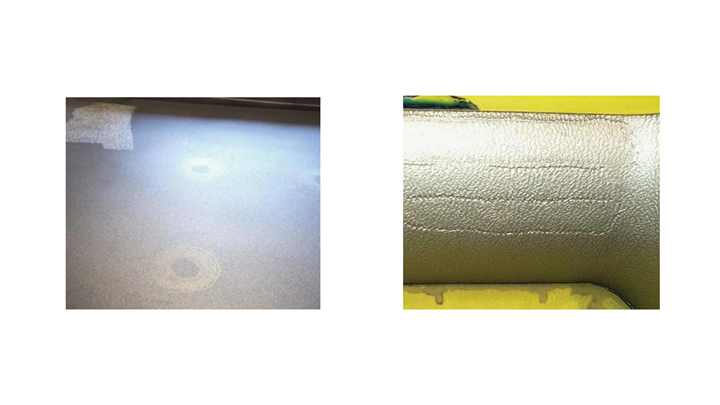
Figure 3a (left) The visible doughnut shapes show how incorrectly-prepared welded areas react differently than the parent steel to etchants.
Figure 3b (right) The visible lines again show how incorrectly-prepared welds react differently than the parent steel to etchants.
Process waste: Disposing of the waste from the texture process has changed over the years and costs a lot more. The waste etchant gets tested for toxicity and the presence of heavy metals is often detected after etching overseas tooling, increasing the overall cost of texturing, and unfortunately a cost that is not seen until after the project is finished.
Summary
The technology of texturing remains a broad blend of old world craftsmanship, chemistry and the latest science has to offer. With a good, general understanding of the process like that provided here, anyone can improve their success with textured molds, from the build stage through a mold’s life.
Contributors:
Pete Kambouris is the Sales Manager at Wisconsin Engraving Company. He has been involved with engraving and texturing for over 20 years. Mike Miller is the director of engineering for New Berlin Plastics. His engineering background includes metallurgy and plastics. He has worked in the injection molding and moldmaking side of the business for 17 years.
For More Information:
Wisconsin Engraving
(262) 786-4521
info@wi-engraving.com
wi-engraving.com
New Berlin Plastics
(262) 784-3120
mmiller@nbplastics.com
nbplastics.com


Related Content

Questions and Considerations Before Sending Your Mold Out for Service
Communication is essential for proper polishing, hot runner manifold cleaning, mold repair, laser engraving and laser welding services.
Read More
Products and Services for Multiple Moldmaking Needs
New year, new technology roundup! Featured here is a collection of product offerings, from profile milling cutters to industry-specific CAD/CAM software to innovative hot work tool steels.
Read More
Machine Hammer Peening Automates Mold Polishing
A polishing automation solution eliminates hand work, accelerates milling operations and controls surface geometries.
Read More
Mold Innovations Power Unique Auto Lighting Elements on Hummer EVs
Diamond machining, electroforming of micro-optical inserts and modified latch-lock system help injection molds produce unique forward lighting elements.
Read MoreRead Next

Local Moldmaking Expertise with Global Competitiveness Takes on Tooling Innovation and Training
From quick-change solutions and world mold systems to offshore tooling consulting and project management and apprentice training, this Pennsylvania mold builder continues to advance.
Read More
Laser Ablation for Surface Texturing
How moldmakers can improve the level of control exerted in surface texturing.
Read More