Re-defining Precision
It’s important not to limit the definition of precision to one in particular, but instead expand the definition to three unique precision types: micro precision, ultra precision and nano precision.
#fiveaxis
If you were to Google “precision machining,” the results would be staggering with more than a half million hits. If you were to narrow the search with “precision milling,” the results would be far less with roughly 41,000 hits. Still that seems to be an awful lot of hits and we don’t even know if the hits pertain to actual machine shops or not. However, if you were to dig further into the results and visit many of the actual machining Web sites from those results, you would be amazed at the number of companies that call themselves a precision shop with no clear indication of what defines them as a precision manufacturer. Some of these companies go beyond the word precision and define themselves as military precision, medical precision or commonly Swiss precision. So the question is: What defines precision today?
Featured Content
Defining Precision
A clear definition is needed to uniquely identify the best in class shops in a highly competitive market. Because the market spans over a very broad range of industries, it’s rather important not to limit the definition to one in particular, but instead expand the definition to three unique precision types.
These types can be identified as micro precision, ultra precision and nano precision. By these three types, precision can be identified in regards to the technology that a shop might have and what you can expect in quality and accuracy instead of using a generic term as precision. Further, each precision type also can be used to define the technology and expectations within a machine tool and can be further used to define the maximum part quality that can be expected of the machine without over complicating things. Precision can now be narrowed to micro precision as precision defined by ±5 microns or less on the workpiece; ultra precision as precision defined by ±2.5 microns or less on the workpiece; and, nano precision as precision defined by 1 micron or less on the workpiece.
Understanding Microns
As you can see we’re no longer talking in terms of English units, but instead talking in terms of Metric units. This method is not only clearer but simpler to work with than thousands, tenths or millionths. Working with microns also is a universally understood unit of measurement and is clearly known and widely accepted around the world. It allows us to define closer tolerances much easier. For example, rather than saying 40 millionths or .00004" it is much easier to say 1 micron or 1 um. Chart 1 will provide you with a clear illustration of equivalent units.
In re-defining precision, it’s important to understand the micron unit. There are several reasons why. First, it gives a better picture of the three types of precision. Secondly, it brings the manufacturing world in line with the advance technology that is available on the market today—from the machine tool to inspection equipment. Additionally, it articulates the trends in product designs toward closer tolerances and miniaturization.
Moving Beyond the Pack
Embracing technology is necessary for survival in U.S. manufacturing today. Current machine tool technology has lowered the bar toward ultra and nano precision. Once only visible in the lab, ultra and nano precision technology has now moved from the lab and R&D centers to the commercial sector.
Although much of the core technology in today’s ultra precision machining (UPM) is not new, it’s the combination of the improved elements and the careful systematic unity that has pushed the technology into a new direction of ultra precision. Further, the tools used to bring everything together have also improved greatly.
To illustrate this, consider the secondary equipment used to build a Ferrari, a Lamborghini or perhaps a Lotus. These unique manufacturers use state-of-the-art equipment to build their cars ensuring performance and quality. Likewise, machine tool builders who claim micro, ultra and nano precision tolerances use a similar approach by using state-of-the-art technology to build state-of-the-art machine tools.
Additionally however, machine tool builders offering these tolerances need to be extremely concerned with their surrounding environment, which includes cleanliness, organization, air quality and temperature control. Bringing micro, ultra and nano precision into the shop and being successful with it also requires the same approach and the same high quality environment.
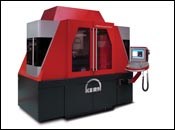
Traditionally reserved for grinding, nano precision is no longer just limited to grinding and has now entered the commercial sector for milling. A nano precision milling machine offers a host of new opportunities—ranging from hard milling for the mold and die industry to jig grinding holes for mold bases. By nature, a nano precision-capable machine along with superior build characteristics is going to produce extraordinary surface finishes. Therefore the possibilities to hold ±1 micron on drilling and milling features on your parts and holding surface finishes of values of Ra 0.05um are now achievable. In the past these kinds of tolerances and surface finishes were only possible in a lab environment on specially designed machines with a very small work envelope. In fact today, workable envelopes as large as 20" x 20" x 15" are possible in a commercial environment.
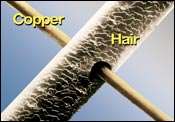
Although there’s really no practical application, Figure 1 shows a hole that was drilled in a 60-micron diameter human hair using ultra and nano precision machining. What should be a clear observation, the hole has a very clean and well-defined entrance indicating the preciseness and smoothness of the drilling motion. The drill diameter was 30 micron or a little over .001” diameter and its size is not visible to the naked eye.
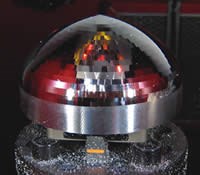
Figure 2 shows an aluminum optical tool that was diamond milled to a mirror finish using the same milling machine technology, but equipped with an ultra precision dividing head. Further, small to medium size molds as well as micromolds can also experience similar results by using ultra and nano precision machining: UPM and NPM.
Manufacturers that use such advanced equipment are capable of meeting the higher demands of new product designs, tighter tolerance requires and lower labor cost through a decrease in part handling by increasing surface finish quality. By investing in the latest technology, manufacturers can truly identify themselves as a best in class micro, ultra or nano precision manufacturer, and therefore move beyond the pack.
Behind the Technology
Nano technology within a milling machine can bring a lot of skepticism. Holding ±1 micron or ±1000 nanometers while obtaining surface finishes of Ra 0.05um, should certainly be questioned. Anyone with any experience in holding tight tolerances should have some doubts about these capabilities, but rest assured the technology is available and results are astounding.
Similar to high-speed machining, nano precision machining or NPM requires a complete circle of technologies that complement each other. NPM shouldn’t be considered machining at slow feeds and speeds in order achieve closer tolerances but rather the opposite.
Using HSM practices is actually one of the center points of NPM where as HSM doesn’t guarantee precision. The primary focus in achieving nano precision tolerances on your parts is centered on the machine tool itself. On the other, your CAD/CAM system must be able to handle the increased tolerance output requirements and this would include surface tolerances.
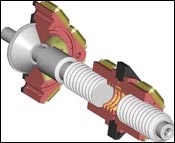
One of the key ingredients of the machine tool for NPM is the drive system: hydrostatic drives and guideways. This drive and guideways technology uses a very small yet very controlled film of oil between the surfaces of the two guideways and between the ball screw (see Figure 3) and nut thus producing no metal-to-metal contact in the motion. This ultimately removes almost all kinetic and static friction from the drive system producing the most precise motion possible.
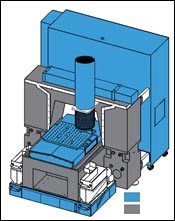
Another important aspect is the ability to control heat within the entire machine tool. A polymer-base machine tool is the start of precision, but to achieve even better results every aspect of the machine tool needs to be completely temperature controlled. This would include the table area, spindle, coolant, electrical cabinet and the fluids for the hydrostatic drive and guideways system (see Figure 4).
Glass scales are also part of a precision machine tool, but it’s important to realize that the finest in precision glass scale must be used—such as .1 micron or 100 nano precision intervals. Some other important factors to consider are the precision quality and location of the tool laser measurement system, the spindle’s ability to exchange the cutting tools in the same exact consistent location and an ultra precision HSK spindle with near zero runout. This in combination with the other systems within the machine tool will no doubt provide you with the ability to achieve nano precision (see Figure 5).
Quality Assurance Infrastructure
NPM doesn’t stop at the machine tool. Having the technology and the quality assurance infrastructure to check such precise parts is quite important. Coordinate measurement systems and 3-D vision inspection systems have been able to stay ahead of the advances in precision machine tool technology. Some of today’s finest CMMs have the ability of measuring uncertainties of 250 nano meters at a resolution of 7.5 nano meters. Additional, 2-D vision systems now have the ability to measure depths. Equipped with a combination-touch probe, laser and white light sensors, vision systems have taken vision inspection into a 3-D world. White light sensor technology for probing has reached into the submicron level by splitting pixels into thirds.
To ensure your nano parts are indeed nano precise, understanding your quality assurance infrastructure is just as important as your nano precision machining infrastructure. If the two technologies work together, re-defining your precision will move you toward the ability to reclaim your position as a real precision manufacturer producing near perfect parts.
RELATED CONTENT
-
The Benefits of Hand Scraping
Accuracy and flatness are two benefits of hand scraping that help improve machine loop stiffness, workpiece surface finish and component geometry.
-
Accelerated Machining for Precipitation Hardness Stainless Steel
A carbide cutting tool manufacturer partnered with a machine tool supplier to demonstrate accelerated machining of precipitation hardness stainless steel, such as 15-5 PH stainless steel.
-
Leading Mold Manufacturers Share Best Practices for Improving Efficiency
Precise Tooling Solutions, X-Cell Tool and Mold, M&M Tool and Mold, Ameritech Die & Mold, and Cavalier Tool & Manufacturing, sit down for a fast-paced Q&A focused on strategies for improving efficiencies across their operations.


