
Plastic Prototypes Using Silicone Rubber Molds
How-to, step-by-step instructions that take you from making the master pattern to making the mold and casting the plastic parts.


Prototyping has been around for a number of years. With the addition of one word, “rapid,” a new industry has been created. Economic concerns along with global competition make additive fabrication a must. An inexpensive and frequently used method in the prototyping process is casting urethane parts from silicone rubber molds. The urethane materials of today, along with moldmaking techniques from previous years, give prototyping the respect it deserves.
This article describes the techniques used to cast quality urethane parts from a silicone rubber mold using a five-step duplicating process:


- Creating the master pattern
- Designing the mold
- Making the mold
- Casting the urethane parts
- Finishing the urethane parts
1. Creating the Master
Pattern
The first step in the duplication process is to create the master pattern. In the past, masters were created in pattern shops from clay, wood or plastics. Today, we can add rapid prototyping (RP) technologies to help in the creation of masters. These technologies include stereolithography and selective laser sintering by 3D Systems, fused deposition modeling from Stratasys, PolyJet from Objet Geometries, 3DP from Z Corp and CNC machined masters.
With the exception of CNC machining, rapid prototyping technologies use a layering technique in their creation. To ensure a quality polyurethane cast part, a post-processing finishing is required in most cases. This finish can be applied by sanding, filing and painting to achieve a uniform smoothness or desired textured effect.
2. Designing the Mold
Setup
Prior to making the mold, venting and gating should be considered. Vents and gates must be formed to control the flow of urethane into the mold. The size and location of the gate required for a specific mold is determined by the volume and shape of the master (i.e. the greater the volume, the larger the gate area). Other factors include wall thickness of the master and viscosity and pot life of the casting compound.
To prevent mold shift, mold locators are vital for precise alignment of mold halves to produce accurate parts. Adding locators in the mold can be accomplished in several ways. A simple technique is to cut a notch in the first side of the mold. A reversal of this depression is formed as the opposite side of the mold is cast. Mold locators may be placed in the setup of the first side of mold construction. Upon curing, remove these locators and pour the second side of the mold.
Silicone Choice
Silicone rubber for rapid prototyping and moldmaking is available in two types: addition cure (platinum base) and condensation cure (tin base). Characteristics of addition cure silicones include:
- Virtually no shrink when cured at room temperature
- Cure can be heat accelerated
- Better chemical resistance
- Generally higher durometer to maintain internal wall integrity
Some of the condensation cure silicone properties include:
- Outstanding resistance to inhibition
- Cure rate adjustable with catalyst base mixture ratio
- Excellent for single-stage book molds
- Low durometer for flexibility in the demolding of complex parts
Silicones also have the ability to withstand a casting temperature range of 390 to 590°F.
When choosing a silicone, one major consideration is the silicone’s resistance to inhibition. Inhibition in silicone rubber is caused by certain contaminants in or on the master to be molded. These contaminants will impair or stop the crosslinking necessary for silicone rubber to cure, resulting in tackiness at the master or total lack of cure throughout the mold.
Materials found to cause inhibition are sulfur containing modeling clays, natural rubbers, arnincs, neoprene, unsealed wood and even wax from paper cups. When in doubt, a patch test is recommended. Inhibition has occurred if the rubber is gummy or totally uncured after the recommended cure time has passed.
To assist in the prevention of inhibition, a standard practice is to use a barrier coating. A barrier coating is an agent applied to the master to prevent the inhibiting property from coming in contact with the uncured rubber. Acceptable coatings can be polyvinyl alcohol, acrylic sprays or the use of paint primers.
3. Making the Mold
Traditional book mold with urethane casting still inside the mold. The book mold process is used when hand pouring urethane material. Photo credit, all: Prototech Engineering Inc.
Once the master is built, a silicone rubber mold can be constructed. The most important characteristic of silicone rubber is the reproduction accuracy. Silicones are widely known for their extreme degree of detail duplication. Silicone rubber also provides the flexibility to construct molds in different ways.
Book Mold
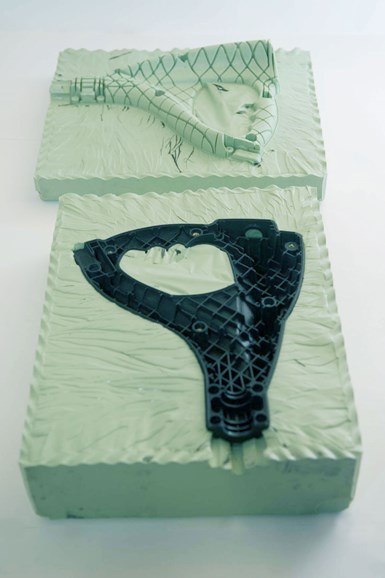
One type of mold is the single-stage or book mold. This type of mold calls for the prototyper to suspend the master inside a mold box and then proceed to encapsulate the part with silicone rubber until the mold box is full. Once the rubber has cured, the mold can be cut in half with a knife. By cutting the mold in this manner, a parting line is created, along with a rippled texture assuring alignment of the two sides of the mold. This is the fastest and most cost effective way to make a silicone mold.
Two-Part Mold
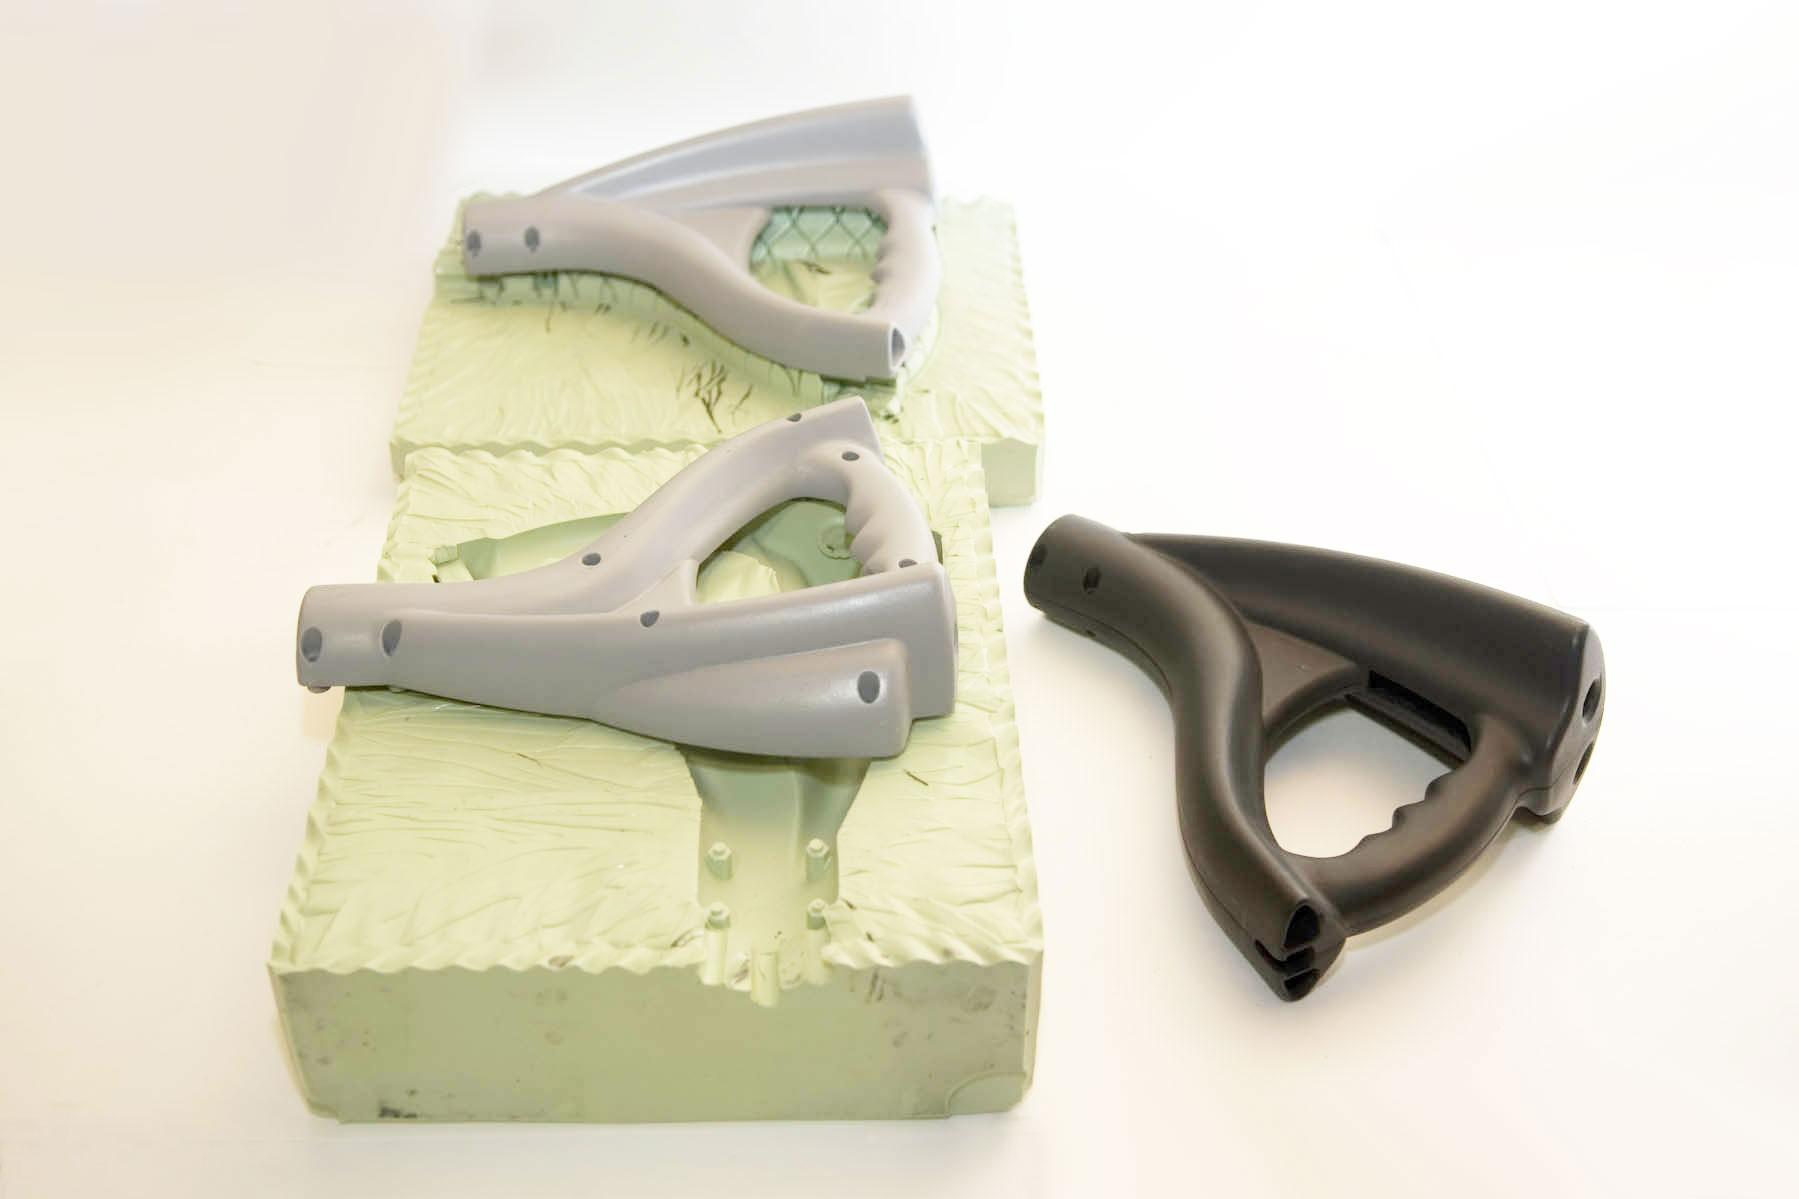
SLA masters were finished by experienced model makers. Then, a silicone mold was created and a urethane casting (black part) was ran.
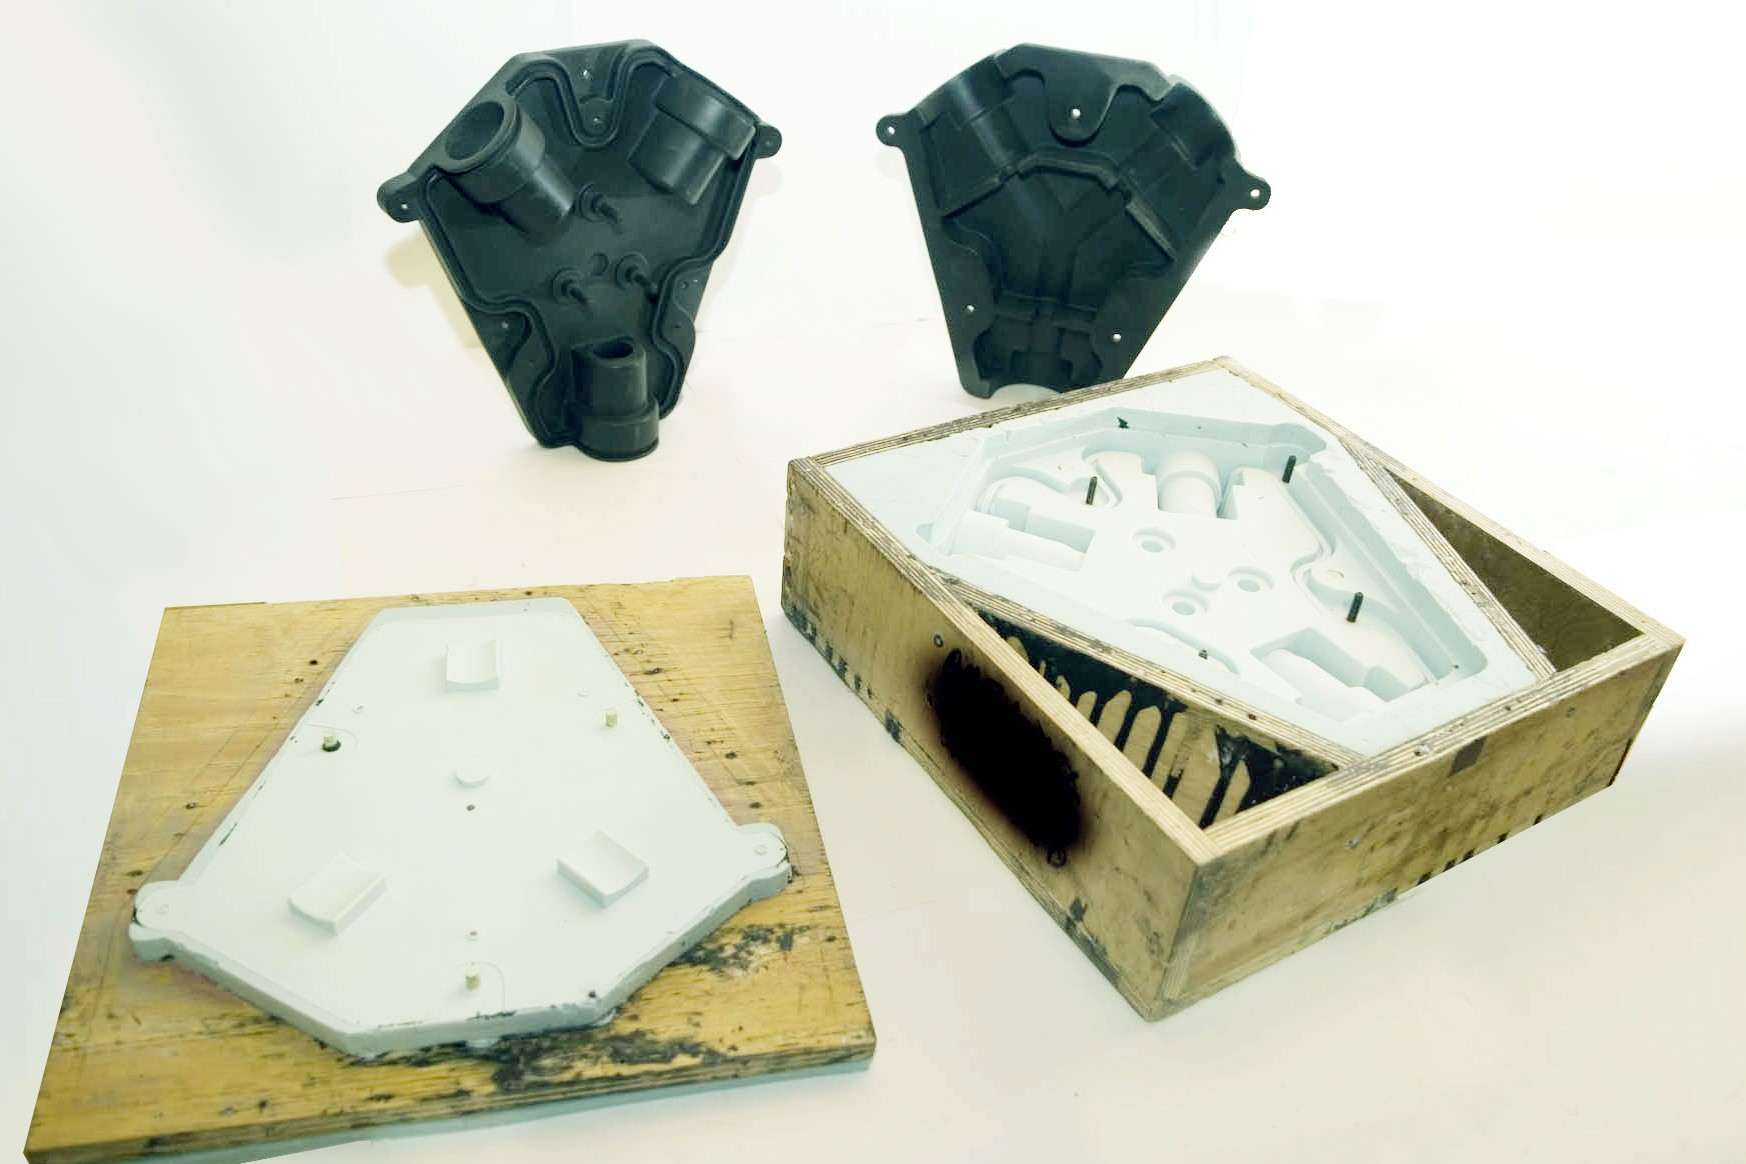
The multi-stage or two-part mold is more labor intensive in its construction than the single-stage mold, but provides for better control of a parting line and will enable the casting of larger parts by providing mold stability. The multi-stage mold is achieved by forming a parting line with modeling clay. A mold box is constructed and filled with silicone that covers one half of the master. After the first pour cures, the mold is inverted, modeling clay is removed and the silicone released from the frame. The frame can then be replaced and the second mold half poured and cured.
Skin Mold
The skin mold or brush-on technique is used for extremely large parts with deep undercuts, tall vertical walls or both. To make this type of mold, the moldmaker begins by applying a pre-coat layer of silicone and catalyst mixture. This coating should be poured over or brushed onto the master. If air bubbles form during this procedure, break them with a light air spray or by hand. Once the pre-coat becomes tacky, a layer of silicone with the consistency of butter is then applied. This “buttering” technique continues until a layer of 3/8 inch is formed. Adding more layers will help with tear resistance. After the silicone has cured, a mold box is constructed and the skin mold is backed or supported with a material made from plaster or urethane foam.
Mixing and De-Airing
Once the prototyper determines which type of mold is to be made and which silicone is applicable, it is time to prepare the silicone for the mold. Begin by accurately weighing the silicone base and catalyst, following the manufacturer’s instructions for the correct mix ratio.
Mixing should take place in a plastic container four to five times larger than the material volume to allow for expansion during vacuum degassing/de-airing. Vacuum degassing/de-airing is recommended for all silicone rubbers when not using automatic dispensing equipment.
The purpose of this process is to eliminate the air bubbles that result from mixing, which can interfere with exact surface reproduction. A bubble next to the master pattern will cause a void. When a casting material is introduced, a bump will occur on the reproduction, adding time in the flash clean-up process. De-air the mixture in a bell jar or vacuum chamber capable of pulling 29 inches of mercury. Under this process, the liquid will froth and rise considerably. The bubbles will break and the material will recede to its starting level.
This very important step in production of a mold takes just a few minutes and is well worth the time spent. Remove the material from the chamber and begin pouring in the mold frame. Pour at the lowest point, allowing the silicone to flow around the master. Do not pour directly over the master. This may cause a wave effect and potentially trap air. Continue pouring until silicone has reached the top of the mold box or at least 1 inch above the master. Set the mold aside to cure following the manufacturer’s instructions. After the mold has cured, separate the mold halves or cut the book mold open (establishing a parting line) and remove the master. The mold is now ready for urethane casting.
4. Casting the Urethane Parts
Urethane Choice
The popularity of silicone rubber molds has prompted urethane manufacturers to produce a wide variety of urethanes. These materials have specifications ranging from a 10 shore A through 85 shore D durometer, to products having a 45 to60 second pot life and a five-minute demold time. Other urethanes have an operating temperature of 225°F up to 300°F.
Considerations for selection should be hardness (durometer rating), tensile strength, impact strength, elongation, heat deflection temperature and clarity. All urethane manufacturers provide specification sheets to assist in selection.
Urethane Casting
Start the casting process by spraying or brushing a release agent on each side of the mold. Put the mold together and affix with tape, rubber bands or screws through the wood frames on two-part molds. Since most urethane systems consist of a resin and hardener, carefully mix these components in a container, much like silicone. Allow for expansion during the degassing process, but at a lesser rate. Place the mix in the vacuum chamber and start the degassing process.
Again, the material will froth and rise. The air bubbles will break and the urethane recedes to the starting level. Pour the urethane into the mold gate in a thin stream. Continue pouring until the gate is full and the urethane has been released through the vent ports.
At this point, re-introduction to the vacuum chamber is recommended to take care of any trapped air. If a chamber is unavailable, the mold can be placed in a pressure pot and cured under 80 to 110 psi until the urethane’s gel time has been reached. Use of a pressure chamber compresses any bubbles or voids to microscopic size, thus producing a void-free, bubble-free part.
To accelerate the curing process, it is permissible to place the mold in a warming oven. Once the curing process is complete, separate the two sides of the mold and demold the duplicate part. To cast more parts, repeat the procedure. Silicone rubber molds will yield approximately 20 parts using this casting method; however, more or less parts are attainable depending on part complexity.
A urethane casting made out of a two-part mold.
Urethane Casting (injection method)
As previously mentioned, urethane manufacturers have developed what is known as “quick cast” or “fast set” urethane. These particular urethanes have a gel time of 45 to 60 seconds with a demold time as short as 5 minutes. Another advantage is higher heat deflection temperatures and increased mold life. Using these urethanes, the prototyper is able to cast 15 to 30 parts per day with overall quantities reaching several hundred parts.
The method for casting these urethanes is similar to the book mold technique. The difference is that an extra gate is added, which allows the cavity of the mold to fill from the bottom to the top. Once the mold is cut open, each side of the mold is sprayed with a mold release and put together with tape, rubber bands, staples or clamps.
Next, the urethane is placed in a cartridge with separate cylinders for the resin and hardener. This cartridge is placed in a dispensing gun similar to a caulking gun and is operated manually or by air pressure. An elaborate dispensing system may be purchased that includes variable mix ratios, line heaters or custom-built to your specifications. A static mix nozzle is attached to the end of the cartridge so the resin and hardener will mix thoroughly. Under low pressure, the urethane is injected in the mold until it flows from the vent. At this point, the mold is placed in a pressure tank to help eliminate bubbles. In approximately five minutes, the mold is ready to open.
5. Finishing the Urethane Parts
The last step in part reproduction is finishing. To finish the prototype part, simply cut off the gates and vents and remove any flash that may have occurred. Smooth any rough areas with a fine file and sandpaper. Should any voids be present it is possible to mix the urethane material, degas and fill with a fine point tool. After this material has cured, remove any excess with a file or fine-grit sandpaper.


Related Content

Power Sliding Clamps Enable Faster Mold Changes
Distributed in North America by Globeius Inc., the MouldPro Power Sliding Clamps can accommodate a range of different mold backplate sizes and thicknesses.
Read More
Hot Runner Systems, Controllers, Auxiliary Injection Unit Exhibitions
Mold-Masters exhibits a wide variety of new and enhanced systems and technologies at K Show like the TempMaster manifold plastic leak detection, the PET-Series two-stage hot runner system and Fusion Series G3.
Read More
MMT Chats: Molds, Molding, Marketing and Membership
MoldMaking Technology Editorial Director Christina Fuges chats with Eric Hecker, Sales and Project Engineer for Eifel about his focus on sales and marketing, the move into molding, technology and training trends and his mission to help increase membership in Mold Technologies Division of SPE. This episode is brought to you by ISCAR with New Ideas for Machining Intelligently.
Read More
Mold Builder Uses Counter-Intuitive Approach for Mold Challenges
Matrix Tool Inc. answers customers’ hard questions with creative solutions for cavity spacing, tool sizing, runner layout and melt delivery that reveal the benefits of running in a smaller press size at lower cavitation but higher yield.
Read MoreRead Next

Dispelling Myths of Rapid Tooling
Six myths of rapid tooling will be dispelled by examining the truth. This will enable the moldmaking and injection molding industries to better accept and sell the growing trend of aluminum tooling.
Read More
Additive Fabrication Creates New Markets for Investment Casting
The development of production-quality direct patterns is changing the cost structure of investment casting.
Read More
Rapid Tooling for Sand Casting
Complex core system design and verification.
Read More