


The most challenging part of implementing additive tooling is getting cooling to and from the inserts in a mold. Here is a quick look at when to use conventional circuits or conformal cooling to achieve optimal production results with additive tooling.
Conformal Cooling or Conventional Cooling
Consistent cooling in a mold is the key to successful molding. Maintaining a consistent distance from the cooling circuit to cavity shape and between cooling circuits avoids hot spots in the mold that can lead to cosmetic defects, slow cycle times, increased operational costs, lengthened molding time and cause late deliveries.


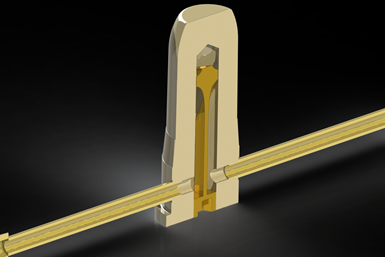
Conventional baffle to cool a core without center ejection or a core pin.
Here are five critical considerations for selecting the right cooling method:
- Determine the fixed design elements such as slides, core pins and sub inserts and then look at ejection and water placement. The key is maintaining a balance between placing cooling where it needs to be and providing ejection in critical areas.
- Look at the part’s geometry. If the geometry is flat and long, consider conventional drilling. However, if there is a significant contour or large, round geometry, conformal cooling is more appropriate. It will avoid level changes in cooling circuits that create hot spots on the mold’s surface.
- Consider baffles and bubblers for cooling standing steel areas like cores and between ribs. This option can be complicated when a core pin is inside of a larger core or the core is too large to cool effectively with a baffle. If either of these is the case, then use a helical conformal cooling circuit, as it opens up the center of the core for venting and places the cooling consistently to the part shape.
- Use a conventional bubbler or baffle if the standing steel is simple cylindrical geometry, and cooling can be placed in the center.
- Use conformal cooling to achieve consistent cooling and to reduce cycle time when cooling complex cores.
Conformal Cooling Considerations
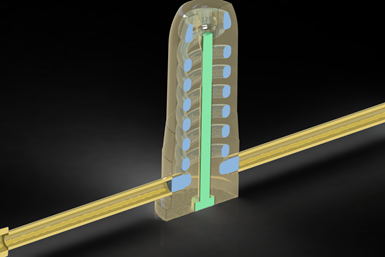
A helical conformal cooling circuit cools the core while permitting a core or ejector pin in the center.
If conformal cooling is the method of choice, the challenge becomes getting the cooling from the outside of the mold to the insert that is buried inside the mold. The number of ejector and core pins, along with other sub inserts, makes the task daunting.
Here are a few recommendations for keeping circuits simple, allowing free flow and eliminating dead spots:
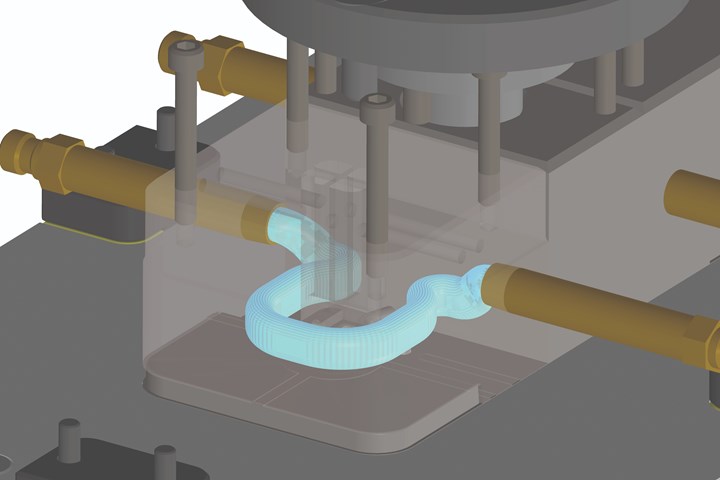
 Conformal-cooled insert fed with cooling lines in support plate using O-rings.
- Keep the circuits close to the insert height in the mold and use a direct route to hard plumb or drill a feed line into the insert. However, this is not always possible due to other mold components obstructing the path.
- Determine if you can drill a cross line in the plate and an O-ring in the face of the support plate under the insert. This approach is a simple way of running direct circuits under the inserts with minimal interference.
- Plumb from under the insert through the ejector plates and clamp plate to avoid obstacles that limit a direct circuit under the insert.
- Use a flexible hose to move between support pillars and ejector pins without drilling.
- Mount flexible hose in front of the ejector plate to get water to lifters and floating cores, and then mount the fittings at the bottom of the mold for easy access in setup.
- Use front stops to limit the travel of plates without crushing the plumbing. Use a lifter with conformal cooling between support pillars or plumb in front of the ejector plate for quick mold disassembly during maintenance. Consult with your mold maintenance technicians to determine the option that will work best with your design and improve mold assembly and ergonomics.
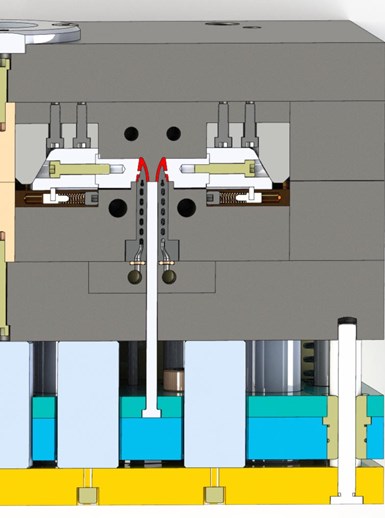
Plumbing the 3D-printed lifter with the hoses in front of the ejector plate makes mold assembly simple to maintain.
While every mold is unique with specific molding challenges, identify common steel geometries to establish cooling standards that predetermine the most efficient method for designing and building the mold with molding and mold maintenance in mind.


Related Content
Exploring ISO 9000 - Part 16 Control of Quality Records
A Series of International Standards for Quality Management and Quality Assurance. We begin 2022 with a review of Clause 4.16 Control of Quality Records.
Read More
Surface Finish: Understanding Mold Surface Lingo
The correlation between the units of measure used to define mold surfaces is a commonly raised question. This article will lay these units of measure side by side in a conversion format so that companies can confidently understand with what they are dealing.
Read More
How to Correctly Size a Hydraulic Cylinder
This week Randy shares steps for correctly sizing a hydraulic cylinder on a mold.
Read More
What You Should Consider When Purchasing Modified P20 Steel
When buying P20 steels that have been modified, moldmakers must be aware of the variations and key issues that affect delivery, cost and lead times.
Read MoreRead Next

How to Design a Mold with Additive Tooling
Designing molds with additive tooling implementation in mind requires blending traditional mold standards with innovative new ideas of what is possible to push the limits of mold performance.
Read More
Selling the Value of Additive Tooling in a Mold
Gaining molder buy-in for a conformal-cooled mold insert requires communicating the mold’s total cost of ownership over the life of the project.
Read More
How to Maintain Additive Tooling
Implementing additive tooling into a mold can be a daunting task, but maintaining it over the life of the tool can be straight-up scary. Here are three steps to include in your maintenance plan.
Read More