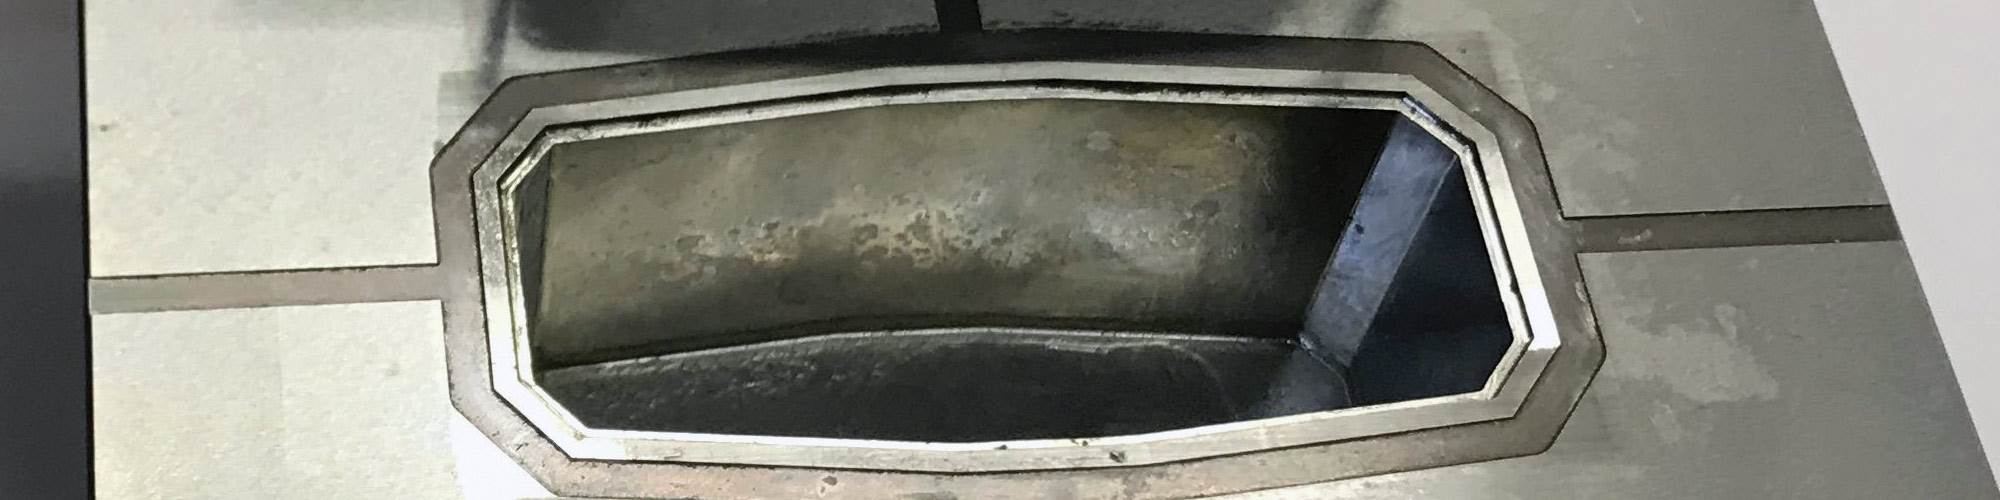

The trickiest aspect of optimal venting is getting the depth right. This cavity for a cap has eight primary vents around its perimeter, measuring about 0.0005-inch-deep x 0.200-inch-wide, that feed into secondary vents. The recessed secondary vent around the diameter of the cavity measures about 0.030-inch-deep with four secondary exhaust ports at the same depth that carry air or gas out to the atmosphere, allowing the plastic material to fill completely and at optimum speed. Images courtesy of The Estee Lauder Companies, New York.

Once the correct vent depth is established, it is imperative that all vent depths, land widths and secondaries are identical from cavity to cavity because deviations in vents can cause an uneven fill, which impacts part-to-part consistency. This cavity for a cap shows a proper gate and runner with a primary ring vent around the whole diameter of the cavity. A recessed secondary vent with four exhaust vents allow gases to escape into the atmosphere.
Share
Venting is one of the most important aspects a mold technician can get right when tweaking a new plastic injection mold for production. When vents are not designed and executed properly, problems can occur.
For example, a build-up of nonaqueous volatiles (NAVs) that can etch (burn) mold cores and cause parts to stick. NAVs are gases that come from the fillers and additives present in the many resins molders use today. On top of parts sticking, a mold technician cannot simply clean off this etching. He must use diamond polishing, which causes unscheduled mold stops and increases startup scrap rates, which in turn add costs in time, money and labor.
Featured Content


One solution for eliminating this situation is to increase the number of vents and determine the proper vent depth. It sounds simple, but there are many components to proper venting, such as vent location, vent width, number of vents, land width of the primary and secondary vents, and primary vent depth.
Never assume that the venting is correct or that the vents are deep enough just because gases are exiting the mold.
For this article, we’ll focus on vent depth, as it has no set number. Vent depth is typically a range that is provided by the resin material supplier. Herein lies the confusion.
Figuring it Out
My early years as a moldmaker in a captive shop for the cosmetics industry taught me a lot about venting.
For example, primary vents are connected to the cavity or core. It is these vents that have the most critical depth requirements. Secondary vents are deeper (by 0.025 inch to 0.030 inch) and are connected to the primary vent and then exit to the atmosphere. Land widths refer to the thickness of the primary vents (distance between the cavity wall and the secondary vent, generally 0.060 inch to 0.080 inch).
I also ran injection presses to sample and debug molds, and learned to adjust gate sizes, cooling lines, runners, flash issues, preloads, shutoffs and vent depths, as required.
Today many of the molders I work with contract their mold builds to an independent moldmaker, but they still must accept responsibility for making the final vent adjustments. However, not all molders know or believe they need to adjust venting areas in the mold. Instead they believe that if the cavities are filling, and they do not see burn marks, the venting is correct. Wrong. Never assume that the venting is correct or that the vents are deep enough just because gases are exiting the mold.
I have seen molds where primary vents were installed but no secondary vents, so although the molds appeared to be filling efficiently at first, the absence of secondary vents did not allow the gas to escape the mold. Mistakes like this can cause inadequate filling, which leads to dimensional variation in the part, holes, voids, short shots and other defects like flash, because the pressure builds up enough to actually separate the mold halves just enough for the material to leak out.
Fitting the vents to the proper depth will not only help the mold fill faster, it will help avoid compressing the gases, which creates more heat. Proper depth will also help the mold cool faster, reduce cycle times, and yield better part-to-part consistency and Cpks (process capability indexes).
The Moldmaker’s Role in Venting
Many times, an independent moldmaker builds a mold based on the type of resin being used, so shrink rates, heat expansion and vent depth are taken into consideration. For instance, if a moldmaker builds a mold that will be running polypropylene, the material supplier will spec a vent depth range (for example, 0.0005 inch to 0.002 inch) based on material type and potential processing temperature, mold temperature, vent location from the gate, injection pressure, mold complexity, wall thickness, clamp tonnage and cooling lines. All of these factors mean that no two mold scenarios are alike, which is why material suppliers spec a range.
As a result, the moldmaker does not know exactly how the molder or OEM is going to process the mold, which means he or she cannot predict the proper vent depth within the range provided. Installing vents with depths on the high side of the range is risky because it could produce a mold that flashes and requires repair. To avoid this scenario, the moldmaker usually sets the vent depths to the lowest number in the range, enabling the molder or OEM to produce a part and then proceed to do the final tweaking of vent depths themselves based on their process parameters.
Sneaky Solution
An effective strategy a mold technician in a molding facility can use to determine the correct vent depth is to sneak up on it. By that I mean, use a spare cavity and core stack and gradually increase the depth of the vents by about 0.0002 inch to 0.0003 inch, cycling the mold after each increase and noting the appearance of the parts at the vent locations. As vents deepen, a whisker-like flash will appear, indicating the need to back off by 0.0002 inch, and revealing the correct depth. Other indicators include burn marks that go away and a slightly improved appearance.
However, it is important to first establish the mold processing window along with clamp tonnage, water temperature, preloads, cooling time, ejection and overall cycle time, as these parameters impact vent performance.
An effective strategy a mold technician in a molding facility can use to determine the correct vent depth is to sneak up on it.
The full benefits of this exercise will only be evident after the technician determines the correct depth and adjusts all of the mold cavities accordingly. It is also crucial that all vent depths, land widths and secondaries are identical from cavity to cavity because deviations in vents can cause an uneven fill, which impacts part-to-part consistency. Once the technician adjusts the vent depth to the proper number, he may find he can then slightly adjust the process parameters, which enhance the mold’s ability to fill the cavities quicker, reduce cycle time and improve part quality and dimensional tolerances. This may seem tedious, but it will pay off in the end.
The next step is documenting the proper vent depth, so that when the mold comes in for preventive maintenance, the technician can more easily check vent depths and compare them to the baseline that was established.
Another important maintenance issue to be aware of is that constantly cycling a mold can cause venting areas to coin into the opposing side of the mold. Coining occurs when an unsupported area (in this case, the vent channel) is subjected to pressure (clamp tonnage) heavy enough to cause embossing where one side is depressed and the other raised. A mold technician should check both sides of the vent location to ensure the vent is not being pinched off due to coining and that it is at the correct depth.
Molders and OEMs should never assume that venting is at the optimal setting when a mold arrives in their facility. Instead, they should determine the proper vent depth because only they know the exact processing parameters they will use. By adopting a process that adjusts the vents to the proper depth at the beginning of mold startup, molders and OEMs will have a better-running mold with good part-to-part consistency, lower cycle times and fewer headaches down the road.
About the Author
Steven D. Shannon
Steven D. Shannon is director of global supplier technical excellence and R&D fellow for The Estee Lauder Companies, New York.
For More Information
RELATED CONTENT
-
Plastic Prototypes Using Silicone Rubber Molds
How-to, step-by-step instructions that take you from making the master pattern to making the mold and casting the plastic parts.
-
Texturing Molds for Thermoplastics: Factors for Success
Factors to consider when selecting a texture or grain for a thermoplastic mold or die.
-
Selecting a Carbide End Mill for Aluminum Applications
Specific geometries and characteristics of a carbide end mill are required for efficient machining of aluminum.