
Going to Extremes with EDM Drilling
Expertise in drilling start holes helps this wire EDM shop give 110 percent on every job without breaking the bank.

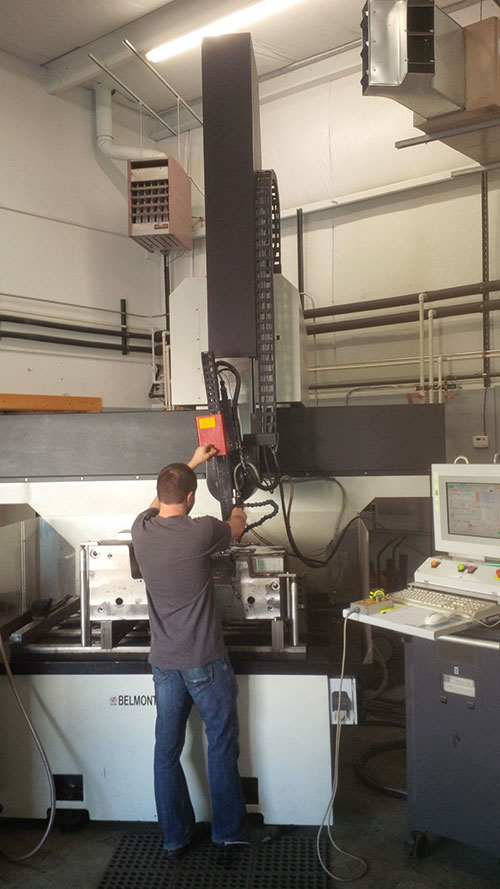
Jesse Cole, machine technician, prepares the shop’s Belmont BT155 to drill a start hole for a channel that will accommodate a vertical lifter in a mold block. Beyond size, a key factor in the shop’s choice of this particular machine was its stationary table, which provides a stable platform for large-part machining, says co-owner Brian Bernt. (Image courtesy of Extreme Wire EDM).
As is the case with many applications, the hole must be drilled at an angle to avoid coolant lines.


Conventional machining doesn’t always cut it for ejector pin holes or the cavities needed for components like subinserts and vertical lifters. For these and other operations, customer requirements increasingly dictate a level of precision that is virtually unattainable by any means other than wire EDM. Yet the equipment—and sometimes the expertise—needed to meet those requirements can exceed the capacity of many mold shops, particularly for larger parts.
For evidence of that, look no further than the recent growth experienced by Extreme Wire EDM. By the time this article is published, the Grandville, Mich.-based company will have moved into a new 12,500-square-foot facility that’s nearly four times larger than its previous plant. This expansion coincides with a deliberate shift in recent years from dies to molds, which now account for nearly 90 percent of the wire EDM specialist’s business, says Brian Bernt, who co-owns the company with his brother, Karl.


That work shows no sign of slowing down, and it continues to trend larger, he says. Thus, plans for the new facility include the addition of a new wire EDM with X-, Y- and Z-axis travels of 47.24 by 31.5 by 24 inches. That machine will complement the shop’s existing large-part workhorse, an AgieCharmilles Robofil 640cc from GF Machining Solutions with X- Y- and Z-axis travels of 31.5 by 21.6 by 20.1 inches.
Yet some of the most important pieces of equipment don’t perform any wire cutting at all. Rather, the shop’s two “hole popper” EDM drills play a critical supporting role: unlocking the other machines’ full potential for meeting tight tolerances. Indeed, drilling start holes in just the right locations, often at steep angles, is among the capabilities that set Extreme Wire EDM apart, Bernt says. However, he adds that the benefits of strategically placed start holes go beyond accuracy. They also speed the wire-cutting process. That’s a particularly important advantage for a shop that takes extra care at the front end to do jobs right for customers that are almost always in a hurry.
No Assumptions
Extreme Wire’s engineers are more than familiar with the sorts of mistakes that can be caused by rushing things, Bernt says. When a job comes in, for example, they don’t assume the CAD model or print is free of error and cut as instructed; they closely examine the design first. They don’t assume that lifters, ejectors and other components will fit as intended; they ask the customer to ship these parts to the facility to check. They don’t assume a single cut will be sufficient to meet accuracy and surface finish specifications; every part gets a skim pass, regardless of whether instructions call for it.
Being extra careful takes extra time, but Bernt says a reputation for quality has been critical to success since the five-employee shop first opened its doors in 1998. Although start holes help with both maintaining that reputation and meeting delivery targets, proper EDM drilling comes with its own set of assumptions to avoid. “Lots of people assume you can wire-cut from outside the block on certain applications, but that is a big mistake,” he says. “All blocks have stress, and cutting from the outside in can make the block either open up or collapse in.”
There are exceptions for certain die-industry work, but nearly all mold jobs run across the shop’s two EDM drills: a massive BT155 from Belmont Equipment and Technologies and, for smaller parts, a modified AgieCharmilles HD20. That’s often the case even for components that arrive pre-drilled from customers that assume only one start hole is enough, Bernt says. One reason for drilling multiple start holes is that cutting a smaller profile from a larger block (a subinsert, for example) requires stopping the wire just prior to coming full circle. This leaves a roughly 0.05- to 0.10-inch “tag” that prevents the part from prematurely falling into the tank. However, gripping by only a single tag can stress the part and cause twisting or distortion, particularly with
larger parts.
Drilling multiple start holes can also improve efficiency, he adds. For one, the aforementioned part movement can reduce the space between the edge of the part and the block. Even without part damage, this can slow skim passes and increase consumable costs by forcing the wire to burn through additional material. Additionally, drilling a separate hole for each shape in a block facilitates unattended machining because an EDM with an automatic wire threader can leave the parts attached by tags that can be removed later. In contrast, using only a single start hole to cut out, say, 20 or 30 subinserts would require removing each part from the block manually and using the resulting cavity as a starting point for burning over to the next.
Some shops also seem to assume start holes can be placed just anywhere, Bernt says, but location is critical to both quality and efficiency. For example, drilling as close as possible to the edge of the material being removed saves both time and wire by reducing the length of the cut required to reach that point. Drilling too close, however, risks marring the edge. Holes should also be placed along flat parts of the cut, because removing tags from a radius can be difficult. “Determining exactly where to place them is really an art,” Bernt says.
Angling for Further Efficiencies
Number and location aren’t the only factors to consider when strategizing about start holes. Some jobs require drilling at an angle to avoid cooling channels. Nonetheless, Extreme Wire EDM’s pursuit of quality and efficiency often has it performing angled drilling even when jobs don’t necessarily require it.
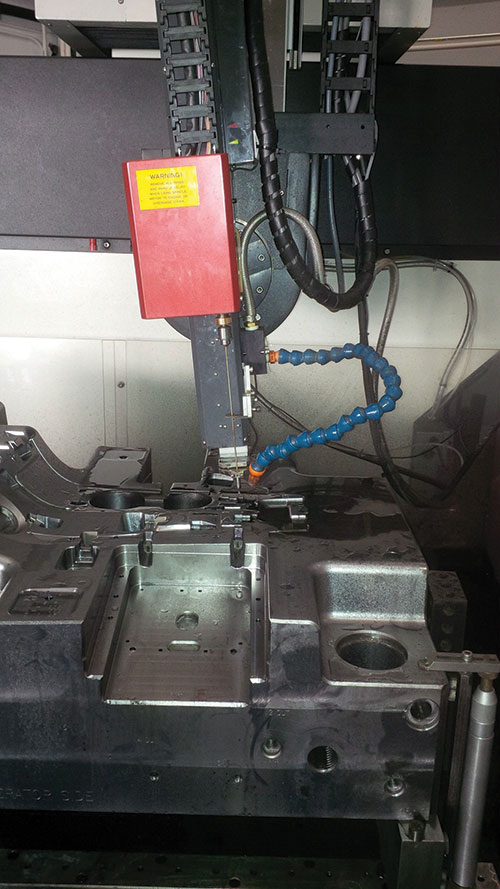
As an example, Bernt cites a commonly requested operation: creating angled channels to accommodate vertical lifters. Many applications would permit threading through a vertical hole, then using the bottom wire guide to slowly slant the wire to the proper cutting angle as it burns its way to a starting point along the side of the channel. However, this approach takes a lot more time—and consumes a lot more wire—than starting with an angled hole at the outset, Bernt says. It can also create additional work. That’s because the bottom of the wire leaves a narrow slot in the side of the channel where it broke through the broader workpiece stock—that is, the point where it could stop moving into position and start cutting the channel’s profile. On subsequent passes, the wire encounters less resistance at this point and speeds up, thereby removing less of the still-intact stock directly above this slot. The result is a difficult-to-remove, vertical line of slightly protruding material on the upper portion of one side of the channel.
As is the case with other operations, expertise in drilling start holes goes only so far. The shop also depends on the right equipment. For angled operations, the Belmont BT155 shown on page 14 is particularly critical, Bernt says. This is a very large machine, featuring a 60.8-inch X axis, a 24.2-inch Y axis, a 30.3-inch W axis (height), and a head that tilts 110 degrees to the left or right. Without the latter feature, drilling slanted holes would require tilting the part itself—a difficult proposition for mold components that can weigh thousands of pounds. “This has helped us out immensely in getting new work,” he concludes.


Related Content

Fundamentals of Designing the Optimal Cooling System
The right mold components can help improve mold cooling and thereby produce higher-quality parts.
Read More
Solving Mold Alignment Problems with the Right Alignment Lock
Correct alignment lock selection can reduce maintenance costs and molding downtime, as well as increase part quality over the mold’s entire life.
Read More
Laser Welding Versus Micro Welding
The latest battle in finely detailed restoration/repair of mold materials.
Read More
The Benefits of Hand Scraping
Accuracy and flatness are two benefits of hand scraping that help improve machine loop stiffness, workpiece surface finish and component geometry.
Read MoreRead Next

Are You a Moldmaker Considering 3D Printing? Consider the 3D Printing Workshop at NPE2024
Presentations will cover 3D printing for mold tooling, material innovation, product development, bridge production and full-scale, high-volume additive manufacturing.
Read More
Reasons to Use Fiber Lasers for Mold Cleaning
Fiber lasers offer a simplicity, speed, control and portability, minimizing mold cleaning risks.
Read More
How to Use Continuing Education to Remain Competitive in Moldmaking
Continued training helps moldmakers make tooling decisions and properly use the latest cutting tool to efficiently machine high-quality molds.
Read More