


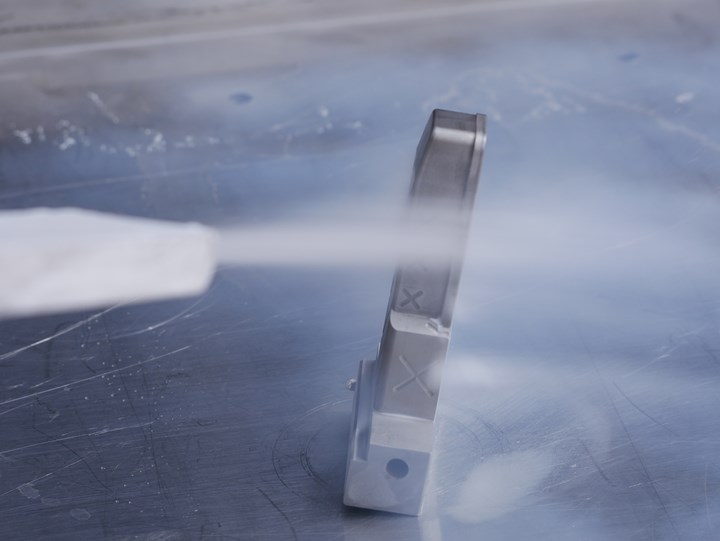
Non-abrasive dry ice blasting is effective for baked-on resins and plastics. Photos courtesy of Alcadyne.
Properly treating the surface of a mold is the only way to ensure a high-performing mold that lowers the cost of ownership and increases the number of parts produced over time. However, proper surface treatment is not a one-time thing; it must be a part of preventative maintenance and includes more than coating a mold’s surface in a hard metal for wear protection. When a mold is taken out of production because a part run is complete or has a maintenance issue, perform a complete mold cleaning and surface treatment program.
This program includes a thorough cleaning of the mold, flushing the cooling channels, checking the cooling channels’ flow rates, performing a leak integrity check, coating the cavity, core, pins, and slides for wear protection and coating the cooling channels to prevent scale, rust and leaks. If you follow this program after the mold is taken out of service, or better yet, before a new mold is put into service, the mold will perform more efficiently and for a more extended period.


Mold Cleaning Basics
Like any tool in a shop, a mold performs better when it is clean and maintained. There are a variety of mold cleaning methods, and not one method will work in all situations. Every mold technician has his or her tried-and-true method for cleaning a mold. If it works for you, keep doing it.
Proper surface treatment must start with an extremely clean mold. Plastic material burned into the grains of the metal will never be coated properly, so try one—or a combination of—methods to get the mold ultra-clean, including dry ice blasting, ultrasonic detergent baths, chemical solvent soaks and good old-fashioned hand scrubbing.
Generally, dry ice blasting and ultrasonic cleaning are the go-to methods for impossible-to-remove residues. Resin vapors cause hard-to-see residues that attack the steel over time and do not permit a uniform coating application, which may result in parts sticking during production. Fillers, stabilizers and release agents also leave residues that are hard to clean. Hand cleaning usually involves the use of scouring pads that can be overly abrasive on polished surfaces and damage textures. A step above a scouring pad is the use of a brush with nylon or wire bristles. Now let’s break down the general steps to a complete cleaning and surface treatment program.
A complete mold cleaning and surface treatment program includes a thorough cleaning of the mold, flushing the cooling channels, checking the cooling channels’ flow rates, performing a leak integrity check, coating the cavity, core, pins and slides for wear protection and coating the cooling channels to prevent scale, rust and leaks.
Dry Ice Blasting
Dry ice blasting is effective for baked-on resins and plastics. It is non-abrasive, and there is no waste stream to manage other than what is coming off the mold itself. It is a loud process, so even if the operator uses ear protection, you’ll need to isolate the area for sound, or everyone in the shop will need earplugs while the blaster is working.
Dry ice blasters range from micro blasters for detail work to heavy-duty blasters for wide areas. The dry ice is shot at high velocity, so be sure to blast a mold with the pressure turned down, so you do not harm the mold. Once you start using a dry ice blaster, you’ll use it on just about every shop tool possible.
On the downside, a dry ice blaster can be expensive. For example, a local supplier charges around $3/pound for pellets, and we may use 50 pounds of pellets or more per mold depending on residue buildup. Keep in mind that dry ice media will sublimate reasonably quickly, even with proper storage, so you must use it or lose it, and buy only as needed.
Also, dry ice blasting is effective only with line-of-sight cleaning, so certain mold surface areas will not get thoroughly clean. Dry ice blasting also cannot clean cooling channels. This application is where ultrasonic cleaning comes into play.
Cleaning Cooling Channels
Before you place a mold into an ultrasonic cleaning system, manually scrub the cooling channels, which is only possible for traditional straight channels, not 3D-printed conformal cooling channels. Most molds have some degree of rust or scale buildup in the channels, so use a simple digital flow meter hooked up to water lines to measure a baseline flow rate (liters/minute) before cleaning. This baseline data will indicate an improved flow rate after cleaning or the presence of dislodged residue in the channel that is restricting flow. You can then use this data to compare the flow rate after coating the cooling channels.
Now is also the time to check for leaks. Submerge the mold in water while blowing compressed air through the cooling channels. For molds with multiple channels, systematically plug the channels and test each in series. It is essential that the mold is dried quickly and rinsed with an oxidation inhibitor to prevent rust. After checking for leaks and recording the flow rate, flush the channels with a water-soluble cleaner or a mild acid cleaner. Then flush the channels with clean water.
Be careful of harsh cleaners that may end up eating into the metallurgy of the mold—particularly metals that contain a certain percentage of nickel, which can quickly cause a loss of mold integrity. Understanding how the chemicals do or don’t react with the metallurgy is paramount because the flushing media that solves your cooling channel scale and rust problem should not create a new problem, such as a leak. After initially flushing the channels, use a gun cleaning kit with various brush sizes to knock off any rust or scaling buildup that remains, then flush one more time.
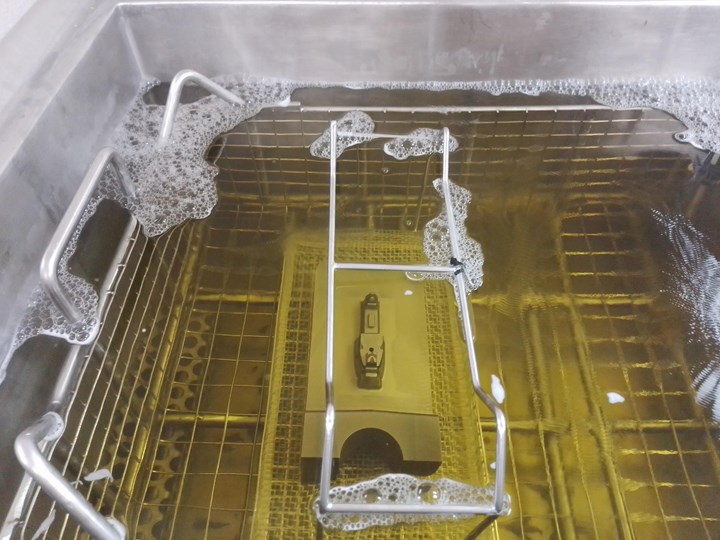
Combining the high-frequency sound waves of ultrasonics with specialty detergents will clean grain structures in areas that dry ice blasting cannot see.
Ultrasonic Cleaning
An ultrasonic bath should be part of every mold-cleaning arsenal and is usually the last stage before coating a mold. Ultrasonics is an efficient use of time, as the bath works as you do other things around the shop. The detergents can get into the grain structure of the mold in ways that scrubbing and dry ice blasting cannot. It also breaks up the hidden rust and scale present in the dark corners of the cooling channels.
Ultrasonics is non-abrasive, easy to maintain and has low operating costs. The systems use high-frequency sound waves that cavitate the liquid media, breaking up any residue on the mold. The more effective baths use heating and specialty detergents. Look for a heavy-duty tub in a size that will accommodate most mold sizes that come through your shop.
If a mold is too heavy for the equipment, suspend the mold in the bath using a hoist. Note that you must keep your ultrasonic tub clean, as fallen residue builds up on the bottom of the bath and will absorb the sound waves, decreasing the bath’s effectiveness. Once the bath is complete (30-60 minutes), give the cooling channels another flush with clean water, check the flow rate and rinse the entire mold. Then seal the mold to prevent oxidation while maintaining an oil-free surface (oils and lubricants will prevent a strong and lasting adhesion of the thin film coating).
If toolrooms follows this approach to mold preventative maintenance and surface treatment, they will experience prolonged tool life, improved cycle times and less frustration.
Mold Coating
Mold cleaning and surface preparation are typically followed by coating the cavity, core, slides, pins, etc. for wear protection and lubricity. For example, use a physical vapor deposition “PVD” process that adds a 3-5 micron layer of coating to the surface of the mold components. For wear protection specifically, use a titanium nitride or zirconium nitride coating. These are 85+ Rc coatings (gold in color) that provide a degree of lubricity for favorable release and protection against seizure and corrosion. A chromium nitride coating (silver in color) has a lower coefficient of friction than titanium nitride, but with a lower hardness of approximately 75-80 Rc. This is moderately harder than a typical chrome plating of 70 Rc.
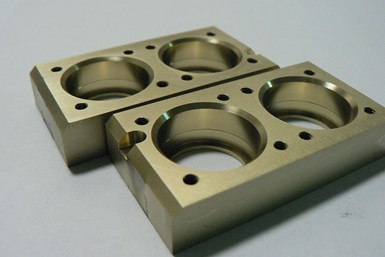
A thin layer PVD coating provides a hard protective layer that won't knock a mold out of machined tolerance.
Thin-film PVD coatings result in uniformity across the entire mold with no buildup on the edges. Because the coatings are very thin, masking is typically not required, and post-grinding to final dimensions is not necessary. Sometimes you will need to mask areas of the mold components with very tight tolerances. However, because of the way the coating is applied, masking bleed-through is not an issue.
These coatings also track the surface texture of the part, so polished surfaces will remain polished and critical textures of the mold will still show through. You can apply PVD coatings to a wide variety of tool steels, such as S-7, H-13, and P-20, as well as aluminum and even non-metal additive manufactured molds, such as digital ABS and other resin molds.
Cooling Channel Coating
All injection molds (whether with traditional or conformal cooling channels) end up with a certain degree of rust and scale buildup. We do not consider a mold’s surface treatment complete until both the outer working surface and the inner cooling channels are coated for wear protection.
To coat the inner diameter of the cooling channels, apply a layer of ultra-thin, thermally-conductive ceramic coating that can provide several benefits that ultimately prolong the life of the cooling channels, increase uptime and save an injection molder money. For small diameter cooling channels, thin the ceramic coating so that it won’t restrict water flow or affect heat transfer, but still allow for excellent protection. The ceramic coating creates smooth walls that decrease scaling, while also providing a barrier layer between the cooling water and the metal wall to prevent dissolved metals from occurring. The coating is very hard (9.0 on Mohs Hardness Scale) to limit pitting corrosion. It is chemical- and solvent-resistant, which allows it to be used in conjunction with more aggressive chemical cleaners.
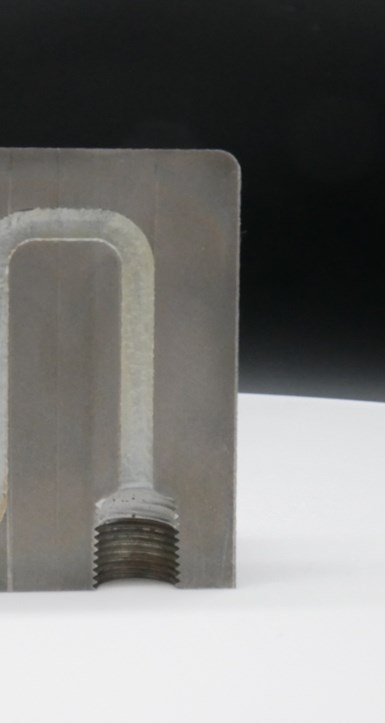
A thermally-conductive ceramic coating in the cooling channel will inhibit scaling and pitting corrosion.
Although this was not the original purpose of the coating, a side benefit of the formulation is that the coating will seal any micro cracks or voids that may have formed during fabrication or heat treatment. This coating can also be used to fix molds that leak from inferior 3D prints with voids in the cooling channel walls or inadequate traditional mold fabrication. It is also an inexpensive alternative to welding repair or mold replacement. After you coat and seal the cooling channels, do one final check to confirm that the cooling channel flow rate has improved after cleaning and coating.
If toolrooms follows this approach to mold preventative maintenance and surface treatment, they will experience prolonged tool life, improved cycle times and less frustration.


Related Content

The Benefits of Hand Scraping
Accuracy and flatness are two benefits of hand scraping that help improve machine loop stiffness, workpiece surface finish and component geometry.
Read More
Revisiting Some Hot Runner Fundamentals
What exactly does a hot runner do? If you’ve been in the injection molding industry for any length of time, you might think the answer is obvious, but it is not.
Read More
Considerations for Mold Base Material Selection
Choosing the right material can greatly affect the profitability and cost of your application.
Read More
How to Correctly Size a Hydraulic Cylinder
This week Randy shares steps for correctly sizing a hydraulic cylinder on a mold.
Read MoreRead Next

PVD Coatings Solve Common 3D-Printed Mold and Part Problems
The right surface modification solution can alleviate a few common additive manufacturing pain points that typically require creating new molds or parts.
Read More
How to Dramatically Increase Mold Life with the Right Coating
Injection mold components experience remarkable wear and tear as high-temperature polymers, often with abrasive and corrosive additives, are injected into the mold. A challenge is how to maintain the efficiency of the component that was witnessed during the first 10,000 cycles. Maybe it just needs a little PVD.
Read More
How to Use Continuing Education to Remain Competitive in Moldmaking
Continued training helps moldmakers make tooling decisions and properly use the latest cutting tool to efficiently machine high-quality molds.
Read More