
Understanding Texture Repair
Developing a texture repair plan will help get a damaged mold up and running.
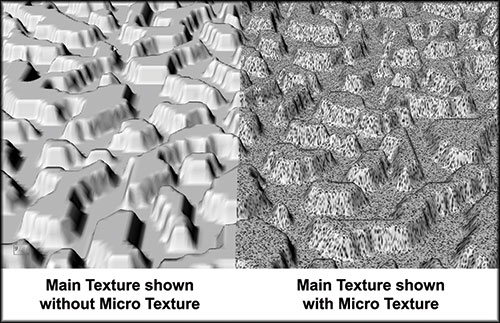
FIGURE 1: Main texture shown without micro-texture (left) and with micro-texture (right).
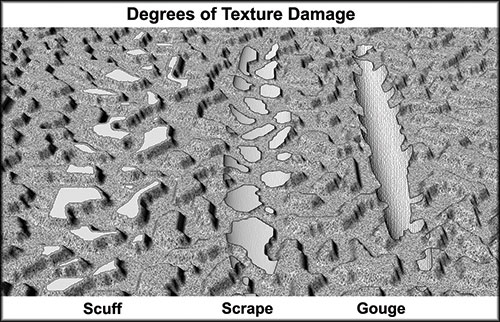
FIGURE 2: Degrees of texture damage.
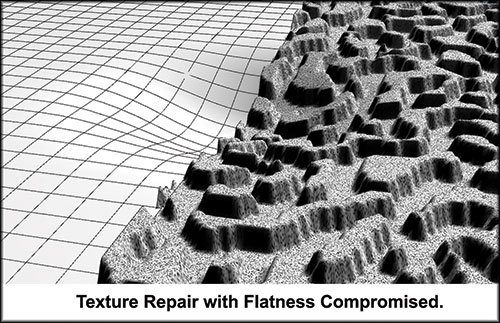
FIGURE 3: Texture repair with flatness compromised.


Suppose a mold needs to produce parts immediately but it has a damaged texture. This can be an everyday occurrence within a molding facility as lifters or pins break and hit the tool surface, causing rust to develop or unacceptable texture wear to appear. These situations call for an action plan to help get that mold back up and running. Here, we will review different degrees of mold damage, how texture is affected and proper repair options.
Texture Level Breakdown
Texture problems that occur during the run of a part generally are caused by a wear-related issue that may have developed over an extended period of time, or because a tool is damaged and can no longer produce acceptable parts. To properly approach both of these scenarios, an understanding of texture finish levels is necessary (see Figure 1).


Level one is the main texture pattern—the profiled details we see and feel. These can be a leather grain, stipple, wood grain or geometric pattern. They are the texture specifications on the part or tool prints, and they typically range from 0.0005 inch deep to 0.012 inch deep.
Level two is the micro-texture. This is applied over the main texture pattern and is typically sandblasted in the final step. There are many sizes and types of blast media, which are often mixed and blended to contribute to very specific gloss results on the part. These micro-textures have depths that range from 0.0001 inch deep to 0.0015 inch deep.
Texture Wear Resolution
Texture wear usually results from the molding material, an additive in the material or a gas from the material. It will first affect the micro-texture, causing the corners of these very fine, shallow profiles to become rounded. This may be noticed on the part as an increase in glossy appearance.
In most cases, micro-textures can be placed directly over the original texture; however, it is important to understand that every time a main texture is sandblasted, it has a wear effect. This means that there are limits to the amount of re-sandblasting a texture can withstand before it is worn down. Fragile textures and textures in soft tooling are especially vulnerable to sandblast damage.
There is a “point of no return” to texture wear, and once that line is crossed, the tool may need to have the texture polished out and re-grained. Therefore, it is important to have a texture expert evaluate specific sandblasting needs.
The main etched texture profile is affected next by wear. If rounded off by molding wear, these larger texture profiles will have a noticeable appearance flaw beyond that of a gloss differential. Some texture patterns (mostly restricted to sand-style textures) may be refurbished with an over-etch if the texture wear is not too extreme. However, once these sand textures become too round, refurbishment is not enough, and they will need to be polished out and re-textured to their original form. Most other texture pattern styles such as leather grains, geometric/technical patterns, wood grains, etc., may not be candidates for an etch refurbishment.
A part/tool review with a texture expert that includes customer expectations will help determine the best process for texture wear resolution.
Texture Damage and Repair Procedures
Texture damage is defined as an impact event on the textured tool surface that left a scar. The following methods (listed in order of effectiveness) are used for initial texture damage evaluation:
• Close-up photos of the damage.
• A molded part that shows the damage.
• A review of the damaged tool.
Figure 2 shows three degrees of damage: a scuff of the micro-texture, a scrape of the etched texture and a gouge that reaches down into the tool. Each of these requires a different repair procedure.
Scuff of the Micro-texture
If the surface has received damage only to the micro-texture, then a re-gloss using the original sandblast media formula will remove the scuff and return the surface almost back to the original finish. The term “almost” is used to account for the wear that sandblasting can cause to an etched texture. This wear happens every time a texture is sandblasted or re-glossed, so it is a concern.
Most textures can be re-glossed at least once and still maintain 95 percent of the original profiles, as long as the technician is trained in the process. Overly aggressive sandblasting can and does damage textures.
Scrape of the Etched Texture
When the main etched grain is damaged, the repair will require acid etching to restore the original texture profiles. The area of repair may be prepped by stoning or polishing out the damage, followed by replacing the texture with etchants often engineered specifically for this application.
Many of today’s textures are achieved through multiple layers of etch applications. In the case of repairs, the layers will have to be reproduced. It is important to know the texture specification so that these layers can be reproduced as accurately as possible.
Some of the repair scenarios for damaged textures will require welding to replace the steel that was removed with the scrape or compression event. The tool’s exact steel type must be noted so the weld metallurgy matches as close as possible to the tool metallurgy. Tool steel manufacturers provide specific welding rod recommendations because differences in steel metallurgy will result in differences in texture profiles.
Weld hardness is another critical factor for successful repair. If the weld is too hard, the micro-texture finish will not match that of the parent steel. This will appear as a gloss differential on the part. Pre-heating the area to be welded and post-weld heating can help minimize this hardness.
A Gouge That Reaches Down Into the Tool
The flatness of a surface is altered when a texture is damaged with a depression, and it is necessary to polish out the texture to facilitate the best texture replacement option (see Figure 3).
Etched texture replacement always removes surface stock, which affects surface flatness. With texture repair, it also is common to face situations where stock is removed from a surface, thereby creating a dip or sink on the repair surface. Using a radius, fillet or parting line to tie in the new texture with the original texture is recommended. By using existing profile changes in the tool, the change in surface flatness is hidden. Oftentimes this means that complete texture removal may be recommended for an area much larger than the damaged area to facilitate texture blend.
Sometimes, the blend has to be done in the middle of a flat surface because there are no radii or fillets with which to blend. In these cases, the metal removal will be kept to a minimum and the texture will be replaced with a slight dip in the surface. Even if the texture replacement perfectly matches the original texture, the dip on the surface may reflect light, highlighting the area. To eliminate the dip, a weld is applied. Then locally texturing the welded area and blending the repair into the surrounding non-welded area is recommended.
Welding Advances
Advances in welding technologies have increased welding options. Traditional welding is best-suited for large applications where an insert is not an option. These welds are applied with a lot of heat, which can cause a heat sink area around the weld. This is problematic to the flatness goal.
Micro-welding uses a smaller-diameter rod with less heat for medium-sized areas because it does not leave a heat sink area. Laser welding is preferred for small spots such as pittings or scratches. In general, it is important when welding to match the weld type with the size of the weld needed. For instance, a large area welded with a micro-weld will require so many passes that the opportunity for porosity and hardness variations can replace the benefit of a lower-temperature weld.
Welding produces different characteristics that can alter a texture’s appearance, hardness and metal composition. This causes the texture to be slightly different than the profile or glossiness of the non-welded areas. In these cases, the texture repair technician will use techniques that adjust for these variances. Texture profile handwork or peening is also used with the etching process for texture repair.
Putting the Plan Into Action
Texture repair requires extensive skill and experience when compared with other texture processes. Too often, texture repairs are complicated when a repair attempt is made by someone not trained in the field. In addition to the experience level of the repair technician, you need to weigh the advantages and disadvantages of on-site and off-site texture repair services.
When the repair is performed on site at a molding or tooling facility, someone must approve the repair and/or discuss any repair modifications. An impression of the repaired texture can be made with casting material to demonstrate the look of the molded part. If the repair is done at an off-site texture facility, the cast can be made of a two-part epoxy and returned overnight for review and approval.
When deciding the best repair option, consider the size of the tool, the timeframe allotted, the extent of the damage and the expectations for the repair. No matter which option is selected, conduct an evaluation of the repair once it is completed to ensure that it meets expectations. In the end, when texture repair opportunities are well-planned and executed by specialists, the rate of success is extremely high.


Related Content

Questions and Considerations Before Sending Your Mold Out for Service
Communication is essential for proper polishing, hot runner manifold cleaning, mold repair, laser engraving and laser welding services.
Read More
Most-Viewed Content of 2022
The most popular MoldMaking Technology content according to analytics reports over the past 12 months.
Read More
Products and Services for Multiple Moldmaking Needs
New year, new technology roundup! Featured here is a collection of product offerings, from profile milling cutters to industry-specific CAD/CAM software to innovative hot work tool steels.
Read More
Technology Roundup: Mold Maintenance, Repair and Surface Treatment Essentials
This roundup focuses on maintenance, repair and surface treatment for mold equipment. Utilizing these helpful products and services can help save time and money.
Read MoreRead Next

Are You a Moldmaker Considering 3D Printing? Consider the 3D Printing Workshop at NPE2024
Presentations will cover 3D printing for mold tooling, material innovation, product development, bridge production and full-scale, high-volume additive manufacturing.
Read More
How to Use Continuing Education to Remain Competitive in Moldmaking
Continued training helps moldmakers make tooling decisions and properly use the latest cutting tool to efficiently machine high-quality molds.
Read More