
The Basics of Tool Management
Proper tool management is the key to saving money - and maybe even saving your business.


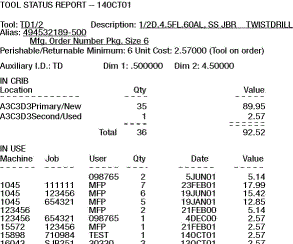
Figure 2: A typical tool status report.

Figure 1: Typical tool activity.
There have been many articles over the years about tool management. Several have addressed the basics or the rules of tool management. Many of these articles have been factual and informative, have presented user testimonials and have provided valid arguments and examples for the need and benefits from implementing tool management.
So why write another article about the basics of tool management? Because very few people have learned from the previous articles. Sure, many read the articles, agreed with the idea and said that this is a great cost saving project, but when it came to implementing their brand of tool management, they modified the basic rules. Why? Because tooling budgets are generally unrestricted.


If you could examine the cost of your yearly tooling expense, you might be surprised at what you are really spending. So, the question is still, why do the rules have to change for each company? Because typically the tooling assets - perishable, durable, fixturing, dies, molds, gages, assembly, form tools, etc. - can represent upward to one-third of your company's manufacturing investment. And whoever controls the allocation of the tool budget simply has the power to make the rules.
Their decisions regarding tools also may be the reason that you need tool management. If you start tracking and accounting for tool use, you may start finding tool abuse and learning what is the true cost of tooling. Those who wish to modify the rules by which tools will be controlled, purchased and used are generally the ones who contribute to the problem of accountability in the first place.
Now, to a lesser degree but not to be forgotten, are the so-called tool users. They are so-called users because they are in positions to specify - even implement - the tool to be used, but may not know what the tool really does. This could be a CNC programmer that has never seen what a tool does in the machine he programmed, a tool engineer that has no shop floor experience or even an operator who likes the shiny inserts instead of the ones specified for the job. These people are less concerned about the money wasted on tools than they are concerned that someone may find out that they aren't as competent at tool selection, specification or usage as they advertised. So they also want to bend the rules for their own protection.
Although this article is based on the basic control needs for tool management, it is important to address the preconceived needs that a company believes it has for tool management because they don't have information that supports what is their real tool activity and usage. Basically, it doesn't matter how the rules are made or who makes them as long as you have accountability and know where the tools are.
However, there is really only one basic rule of tool management - all other rules only try to help you implement it. The rule is: Know where all of your tools are.
Do You Know Where Your Tools Are?
Tools have a tendency to be issued from their storage location to the point-of-use on the shop floor. Once issued and used, the tool may return to its original storage location, stay at the usage location, remain as a dedicated tool or be discarded. However, over the course of time, the tool will ideally find its way back to its original issue location. When that happens, decisions are made concerning its usable condition.
- It's reusable as is - return it to a storage location.
- It needs reconditioning, so send it out for repair or resharpen it.
- It is un-repairable - discard it.
This is a simple explanation of the normal (desired) flow of tools in and out of the tool crib (see Figure 1). If you have a procedure for capturing this information, you will know where all of your tools are. To help you accomplish this feat, a few basic common sense rules need to be set up before your tool management system can be put into motion. The following ten rules will provide the foundation upon which a successful tool management system can be built.
1. Control the access to the crib. Put a lock on the door.
2. Organize the storage cabinets, shelves or shoeboxes that are used to store the tooling. Give the locations names, tags or some sequence of identification - numeric, alphabetical or both.
3. Insist that all tooling issued and returned be recorded through the system. This insures a higher degree of accuracy.
4. Involve the crib personnel from the beginning of your tool control project. They know more about how the tooling is issued than anyone else and can provide information critical to the building of the tool database.
5. Train all tool crib personnel. Provide at least two competent system administrators for overall system control. Insure that someone who understands the complete system operation can be reached by all operating shifts.
6. Establish guidelines for the return of tools to the crib for rework consideration, for the scrapping of a tool or to return the tool to its original or used location.
7. Review your purchasing procedures. Hold a joint meeting with all personnel involved in the requisitioning and purchasing of tooling. With tooling under control, piecemeal ordering should become the exception, not the rule.
8. Establish rules for defining what are perishable or durable tools and if they are expected to be returned to the tool crib. A suggested guideline could be as follows:
- Perishable tools can be consumed by use; i.e., drills, end-mills, taps, carbide inserts, etc.
- Durable tools are generally not consumed by use; i.e., toolholders, collets, dies, micrometers, fixtures and power tools.
- Returnable tools are expected to be returned to the crib after use; i.e., a perishable/returnable could be an endmill that can be reground and reused or a durable/returnable could be a set of micrometers or a toolholder that is to be stored in the crib after use.
- Non-returnable tools are not required to be returned to the crib after use or tools that are permanently assigned to a department/ machine or employee; i.e., a perishable/non-returnable could be small diameter drills or gloves and a durable/non-returnable could be special toolholders, fixtures, arbors or dies assigned to a specific machine.
9. Establish rules for reordering perishable and durable tools. A suggested guideline could be as follows:
- For perishable tools - reorder when the total quantity of tools in the crib inventory is below the defined minimum quantity. Used tools in the crib are included in crib inventory, in-use tools and tools in rework are not included as part of the available inventory.
- For durable tools - reorder when the total on-hand quantity of tools is below the defined minimum quantity. Tools located in the crib and on the shop floor are included in the total. The exception is non-returnable tools - only the crib quantity is considered.
10. Agree on a tool numbering system and stick to it. All tooling items must have a discrete and individual identification to distinguish one item type from another. Establish a group to be responsible for the implementation and maintenance of the numbering procedure.
Don't try to do this by yourself. Form a committee including other departments that are closely involved with tooling. Involving others will allow them to point out conditions or raise questions about how to control the various situations that occur daily with tool use on your shop floor. These questions will point out many of the situations that contribute to your tool management problems.
The goal should be to define the extent of tool management needed, strengthen interdepartmental procedures involving tools, define the elements needed to define the tool database and understand the primary benefit of tool tracking.
Remember - know where all your tools are. There is one undeniable fact - if you do not know where your tools are, you cannot report anything about them, account for them, charge them to anything or anyone, plan their use, order them with any savings plan in mind or control their end use.
Why Tool Management?
There are many contrived reasons for tool management - most are veiled in the fact that there are no facts about active tool use or where they are stored. Hence many ideas surface about what tool management should do, what should be reported and how it should operate without any facts to support the idea. Many of the reports specified are contrived because no one knows where the tools actually are or how many were actually used. If the basic rules are implemented and followed, the need for more information and all the special reports generally disappear. The reports help insure that tools are ordered on time, have sufficient quantities in stock, are visible at all times through tracking reports and are accountable.
An example of one of the many reports that can be generated by capturing the tool issue and return transaction activity can be seen in Figure 2. In the hands of many manufacturing professionals, bottlenecks can be identified and avoided by interpreting reports of tool activity. When looking at Figure 2, a few questions may arise about why user MFP has so many tools still in use on Machine 1045 on different jobs. This may prompt you to run a report just about user MFP. Are there more tools that he has in his possession that you should know about? Is MFP a tool hoarder or is there some other situation preventing the return of these tools? By narrowing the reports of tool activity at machines, jobs and user's potential bottlenecks can be spotted and avoided before a tool crisis appears on the shop floor. If manufacturing is experiencing problems with a tool or job, checking its use across other machines running the same job can narrow the problem to the tool or the machine or the job setup. Without tool visibility, most people contemplating tool management don't have enough information or insight to understand the question that they are trying to ask. The most important point to implementing tool management is to keep it simple. Get the tools under inventory and tracking control. Then evaluate the next steps. You may find that your next steps could be very different from what you preplanned.
Basic Features for Tool Management
This is not an exhaustive list, but one you can use to get started.
- Tool/part number.
- Description.
- Price.
- Quantity requirements.
- Where used by shop floor, machines, jobs and users.
- Minimum/maximum inventory levels.
- Reorder point.
- Vendor information.
- Leadtimes.
- Custom and standard reports.
- Tool storage stations.
- Tool issue tracking by employee, date, job and profit center/machine.
- Support transactions.
- Ease of use.
- Process new and regrind tool activities.
- Tool tracking cross-reference.
- Tool availability.
- Status reports.
- Ordering reports.
- Basic inventory information reports.
- History information.


Related Content

How to Eliminate Chatter
Here are techniques commonly used to combat chatter and guidelines to establish a foundation for optimizing the moldmaking process.
Read More
Plastic Injection Molding Starts with the Pellet
This summer, let’s get back to the basics. For this summer school basics series, Pellet to Part explores each stage of the plastic injection molding process. This week: what every moldmaker should know about raw materials, including the fundamentals of viscosity curves, Melt Flow Index, Melt Flow Rate, shear and more.
Read More
Forces and Calculations Are Key to Sizing Core Pull Hydraulic Cylinders
To select the correct cylinder, consider both set and pull stroke positions and then calculate forces.
Read More
How to Supply Cooling to Additive Tooling
Additive tooling provides limitless options for cooling a mold’s difficult-to-cool areas.
Read MoreRead Next

How to Achieve Tool Shop Optimization
A five-step methodology to face your delivery, quality and cost challenges head on.
Read More
Overcoming Pain Points in Moldmaking with AI
Shops that embrace AI as a tool, not a threat, can enhance efficiency, preserve expertise, and attract tech-savvy talent.
Read More
How to Use Strategic Planning Tools, Data to Manage the Human Side of Business
Q&A with Marion Wells, MMT EAB member and founder of Human Asset Management.
Read More