
Hot Runner Running Efficiently?
Follow these tips to set up your system and keep it running smoothly.
The key to trouble-free operation is to provide proper design, setup and operating parameters when you specify the system.
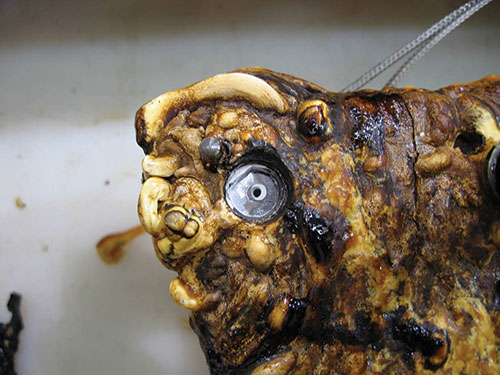
Don’t let this happen to you: Leaking nozzles are a common and messy problem that comes from improper setup and operation.
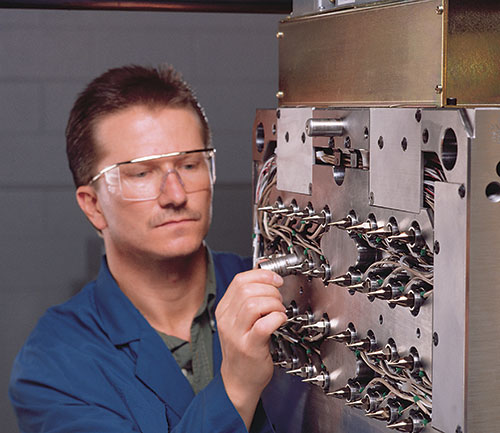
Compression nozzles leave room for the expansion that occurs with excessive process temperatures and absorb it without placing stress on the components. Here, an operator checks a machine’s nozzle tips to ensure they’re properly centered in the manifold nozzle seat to prevent material leakage.
Share
For years, injection molders have reaped the benefits of hot runners because of their ability to reduce material use and produce faster cycle times. And now that more and more moldmakers are adding presses for sampling and production purposes, they, too, are seeing the benefits of hot runners from an entirely different perspective.
All that said, one drawback of hot runners is their complex startup process. But there are numerous things molders and moldmakers can do proactively to ensure the process goes smoothly, and there are best practices to consider for keeping your hot runner system up and running once you’ve got it set up to your liking,


Here are a baker’s dozen checkpoints for minimizing problems and maximizing efficiency and uptime in the operation of your hot runner:
1. Determine whether you need grounded or ungrounded thermocouples for your temperature control. A lack of communication between a temperature control supplier and a hot runner end user can be a source of many problems, including fluctuating temperatures after reaching setpoint and material burning. Some temperature controls work well with grounded thermocouples, others with ungrounded. One of the safest ways to go is with a universal controller, which works well with both.
This is not just a consideration for new molds, but may be appropriate for inherited molds as well. Your thermocouples may have loose contacts with the molds, and they can become ungrounded as temperatures rise.
You can use an ohmmeter to check whether your shop is using grounded or ungrounded thermocouples. You can also take a red or white lead and touch a bolt on your hot runner. If you get a direct short, your thermocouple is grounded. Perhaps an easier way to answer this question without testing, however, is to ask your supplier.
2. Isolate grounded thermocouples. Start your project by using an integrated control system that has the ability to isolate grounded thermocouples. This ensures the thermocouples don’t have the opportunity to interact, leading to false readings (i.e., improper temperature control). If allowed to interact, thermocouples can also provide a path to ground when the heaters leak current into the thermocouple inputs, creating permanent damage to the control system.
A broken lead on a thermocouple is hard to detect and will lead to off-specification temperatures in your hot runner system. Isolating the thermocouples will help keep the system operating at optimal efficiency.
3. Seek safety features in control systems. Some integrated controls are available with built-in mold connection systems that break the thermocouple connections if they detect leakage currents and essentially prevent “frying” of your control system. This is a key feature to seek out before purchasing and implementing a control system.
If you have already implemented a control system and checked the grounding for the thermocouple, but still believe there may be a discrepancy between the temperatures displayed and the actual temperature, do a manual check. It is possible that the computers are misrepresenting data for one reason or another. To do such a manual check, connect a handheld pyrometer electrically in parallel to the same thermocouple to see if it shows the same temperature as the control.
4. Check heater ohm readings. On new hot runner systems, make a record of all the ohm readings for the heaters, then check those readings again during maintenance of the tool. Any reading higher or lower than baseline usually indicates an impending failure. While the tool is down for preventive maintenance, you may want to change those heaters. In most cases, front-loaded heaters can be changed out in the press. If you have to disassemble the hot runner to change nozzle heaters and the tool is already out of the press, you’ll prevent a lot of downtime if you just change the heater immediately.
5. Cycle new heaters three times before use. When you install a new heater, test it on the bench before trusting it. If a brand new heater is going to fail, it usually does so on one of the first three starts. So start it up, cool it down and repeat two more times before giving the mold a clean bill of health. This practice also bakes out damaging moisture.
6. Ensure machine settings match material specifications. Material gas-off during molding is commonly caused by machines that are not set to the material manufacturer’s recommendations. The material, therefore, overheats, causing hot runner problems.
Materials often have so many additives that no one can know all the correct machine settings and critical material gas-off temperatures without the documentation. Previous jobs that used a particular nylon, for example, may have required different settings than another job using a different nylon material.
7. Check nozzle orifice size. Off-the-mark orifice size can cause high or inconsistent pressure, which can burn material and create silver streaks on parts. To avoid this problem, start by ensuring the molding machine nozzle radius is the same size as the nozzle seat radius of the manifold. Proper sizing prevents material “drooling” and creates a leak-proof seal. Adjusting the machine nozzle orifice to match will drop the pressure and allow more material flow, preventing burning and streaking problems.
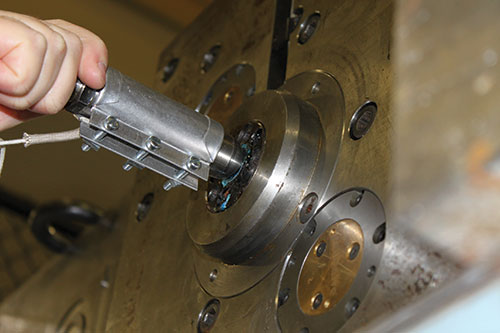
8. Inspect the nozzle tip and hot runner seat. Ensuring that the molding machine nozzle tip and the seat of the hot runner system are properly centered can prevent leakage. An easy way to check nozzle centering is to put a sheet of paper between the nozzle tip and the seat. Move the barrel forward so the nozzle tip touches the seat, and look for a clean circle cut in the paper. Make adjustments to the molding machine carriage as needed.
9. Start the hot runner properly. Damaged manifolds caused by plastic leaks are usually the result of improper startup, a common error. Molders in a rush sometimes turn on all zones of the manifold at the same time. The nozzles heat up fast and then snug up to the manifold—which is still heating up to operating temperature and needs room to expand.
To avoid this problem, heat the manifold first to allow expansion. When it reaches the proper temperature, a green light will appear on the controls. Then turn on the nozzle zones. Improper startup won’t cause problems right away, but after about six months, you will get a burr, and a damaged manifold is inevitable. This is especially true if you’re using a seal ring on the nozzle heads.
10. Check that the machine is pre-filled before startup. A hot runner system must start full of material, but pre-filling can be difficult because some molding machines are not built to extrude plastic with the mold open. If that’s the case with your machine, use this process to pre-fill the hot runner system: Close the mold, jog the screw forward, open the mold and look for plastic. Repeat this process until plastic starts coming through the gates. Once you see plastic, clear the gates and mold surfaces of material and start molding.
11. Purge material from the previous day’s cycles. If material sticks to the mold at the start of the day, it’s because material was left in the system and it degraded overnight. This problem is especially prominent when working with heat-sensitive material such as nylon. When this happens, heat up the nozzles to compensate for loss of heat soak. Remember to turn the temperature down to normal process temperature after about five minutes to avoid overheating the material. Eliminate this problem completely by purging the system with a commodity material such as polypropylene or polystyrene at shutdown.
12. Don’t use a hot runner to melt the material. A hot runner system is an extension of a machine barrel; it’s meant to keep melt flow the same as it enters the mold. If you use hot runners to get all the material up to temperature, many problems will occur. Gasses won’t free-off and you’ll have spitting or bubbling plastics and/or gas coming out of the nozzle tips. In addition, material residence time may be increased because the material is too hot going into the mold.
13. Pay attention to proper maintenance. Once you have your hot runner system set up properly, you’ll want to keep it that way. Here are some things to consider:
• Wear due to the abrasiveness of the material adds to the maintenance frequency a tool requires. Filler and additives are commonly used today to enhance part performance. In these cases, preventative maintenance frequency should be increased beyond the normal recommendation. Cycle time, injection pressure and velocity of the plastic through the hot runner system can also have an influence on the maintenance frequency required for each mold. Much like a car, the harder and faster you push it, the greater the frequency of maintenance.
• Some materials require very high melt and mold temperatures. In a valve-gated hot runner system, seals in the valve pin actuator are adversely affected by higher temperatures. With all valve-gated systems, leave mold cooling on after the hot runner has been shut down. This allows removal of heat from the hot runner system and does not allow the mold plates to absorb the residual heat from the heated components. Removal of the heat from the system protects seals and o-rings from damage. Exposing the seals and o-rings to high temperatures repeatedly will accelerate their degradation. Exposure to heat beyond the specifications for the seals will degrade them to a point that they will fail, causing leakage of the air or hydraulic fluid used to actuate the valve pins.
• Hot runner systems are much like the barrels on a molding machine in that they require a soak time once the temperature reaches the set point. This soak time allows all material within the system to reach a temperature at which it is thoroughly melted.
• Many hot runner systems are damaged when injection pressure is allowed to go to the maximum the machine is capable of—trying to push unmelted plastic through the hot runner.
If you have followed all these steps, you will produce better parts, prevent future problems and keep your molds running at optimal levels.


Related Content

Moldmakers Deserve a Total Production Solution
Stability, spindle speed and software are essential consideration for your moldmaking machine tool.
Read More
Advantages and Disadvantages of Copper and Graphite Electrodes
Both copper and graphite provide approximately the same end result, so it is important for a shop to consider the advantages and disadvantages of each material in order to discover what would work best in their shop floor environment.
Read More
Maintaining a Wire EDM Machine
To achieve the ultimate capability and level of productivity from your wire EDM on a consistent, repeatable and reliable basis, regular maintenance is a required task.
Read More
Forces and Calculations Are Key to Sizing Core Pull Hydraulic Cylinders
To select the correct cylinder, consider both set and pull stroke positions and then calculate forces.
Read More