
Hot Manifold Repair: What’s so Tough about it?
Maintaining a typical hot runner system takes mold maintenance skills to the next level.
When a hot runner system fails, the economic efficiency it provides is lost. Images courtesy of ToolingDocs.
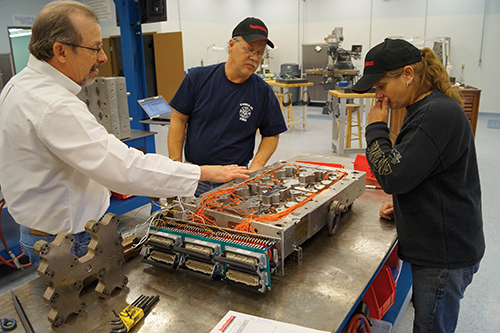
Here is an example of hands-on technique training being performed at a bench under the guidance of hot runner journeymen.

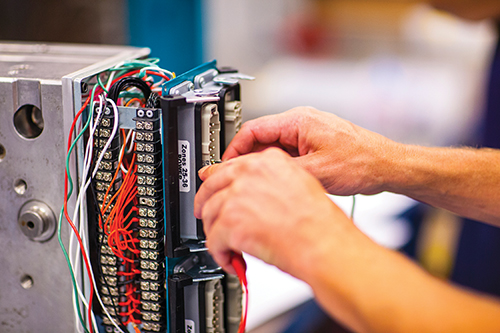
This hot runner system is being re-assembled following a cleaning. The left half of the manifold is correctly cleaned and assembled, while the right half is still being assembled.
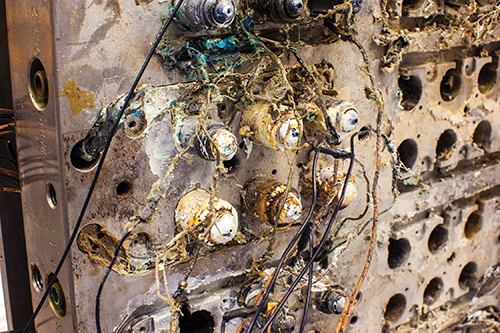
This flooded, or encapsulated, hot runner system is in need of repair.


There’s no denying it. Hot runner manifold repair can strike fear into the hearts of even seasoned repair technicians. As one who trains technicians on everything related to mold repair and maintenance, I’ve heard literally hundreds of horror stories about manifold catastrophes that drive stress up and profits down.
With manifold manufacturers predicting that 60 to 75 percent of all new molds will include hot manifolds of some type, it has become more evident that repair technicians will need more hands-on training to learn how to work on these touchy, but extremely cost-effective mold systems.


By training, I don’t mean parking a technician in front of a computer to listen to someone wax on about how things should be done while showing hot runner drawings and diagrams, or having the technician read hot runner maintenance manuals. I’m speaking about good, old-fashioned, hands-on technique training that can only be practiced and learned—with positive results—at a bench, under the guidance of hot runner journeymen.
Where Did All the Hand Skills Go?
In the repair arena, the level of hand skills and the ability
to work proficiently with precision tools is heading in the wrong direction. That there is a skills shortage in this country is an understatement. This term usually refers to the lack
of technical knowledge that is required to maintain expensive and advanced equipment, but it can also apply to mold-repair skills. The ability to make the hands do exactly what they should in mold repair is fading fast. It takes practice. But perhaps even more important is for repair technicians to learn sound bench techniques from which to grow.
For example, it’s been proven that quarterbacks can’t throw accurately if they have certain tendencies that don’t allow their feet, shoulders, hands and arms to be in the correct position as they release the ball. It’s the same for most tradesmen. Repair techs can’t control tools if they are using the wrong technique, not to mention the wrong tool. In addition, they often aren’t aware of bad habits within the technique, especially if they have never been properly trained.
Often, the skills missing are the physical kind that allow someone to read a set of micrometers, or gauge a tight or loose fit, or use sight or hearing to “read resistance” when using tools or machines. Not having these abilities will render us “tooling replacers” who are capable of very little precision or delicate work.
Shops have not consciously chosen to become tooling replacers as part of a maintenance strategy. Rather, it’s borne out of necessity as companies struggle to find people with hand skills. Products need to be molded and molds need to run, so just stick in new tooling and be done with it. The talent pool for experienced bench technicians is just not keeping up with demand.
Why Is Hot Runner Repair Difficult?
Hot runner work takes the required skills mentioned here to a higher level. Mistakes made and procedures not followed or simply overlooked can be catastrophic. All the economic efficiency that a hot runner system brings to the table is lost when it goes down for extended amounts of time and needs new heaters and thermocouples.
Whenever manifolds are disassembled for preventative maintenance or to repair issues that affect production/part quality, a few basic bench principles should be applied. Determine if the following basic rules of hot runner engagement are being practiced in your shop. If not, training is in order.
Basic Disassembly:
- Verify the maintenance plan before you start any work on the system. Are the cycles known?
- Review any images, data or tech-tip-type of instructions that can prevent mistakes and damage to person or mold.
- Before any work is done, map out the electrical system with an ohmmeter to verify or discover any existing problems with connectivity, grounding or resistance.
- Verify what tooling is on hand. Do you have spare heaters, thermal couples or other tooling that might be needed if things go wrong?
- Take pictures.
- Put the mold in the recommended position for disassembly. For valve pin systems, it’s best to heat up the nozzles and manifolds to take the valve pins out versus trying to muscle them out cold.
- Handle all tooling with caution. Don’t haphazardly pile tooling into a solvent pan to clean it. Instead, make and use tooling “boards” and rubber hoses to protect nozzle tips.
- When the rear clamp plate is removed, be sure to take height measurements at the four corners of the manifolds before anything is unbolted to use as a reference when re-assembling the manifold.
- Pay attention to everything. Develop a checklist:
– Bolts (missing, stripped, broken, difficult to remove)
– Wiring (paths, numbering, condition, splices, clips)
– What aligns the manifold with the plate?
– Plastic leakage (where, burned or fresh)
– Nozzle tips (dinged, broken, damaged)
– Valve pins (bent, broken, worn, reworked)
– Seal/O-ring condition and lubrication level.
Basic Assembly:
- Ensure that everything is clean and flat.
- Make sure all corrective actions (terms and tooling) have been documented.
- Look at the pictures you took during disassembly.
- Put away all brass, copper, aluminum and other “flaking” hammers. Use soft, cold-rolled-steel hammers instead.
- Pay attention to any resistance you feel during procedures that seems excessive. A bigger hammer might not be the best option.
- Manifold bolts should be “anti-seized” and torqued to either print specifications or bolt-size specifications.
- Re-check the dimensions at the four corners of the manifolds to verify flatness across the manifolds. For example, look for pinched wires and other things that could cause the manifold to not be in the proper position for tightening.
- Make sure all wire clips are back in place.
- Verify electrics with the ohmmeter before the rear clamp plate is re-installed, then verify again after. This is a quick procedure, even with high-cavitation molds.
- Button everything up and say a “Hail Mary.”
In both the disassembly and assembly stages, repair technicians need to develop a heightened sense of “feel” by using better tools and techniques. However, these repair technicians should not shoulder the whole responsibility for effective mold maintenance. Companies must recognize that the working environment of the repair shop, including shop design and knowledge sharing, has everything to do with improving the level of work that gets accomplished.


Related Content

Laser Welding Versus Micro Welding
The latest battle in finely detailed restoration/repair of mold materials.
Read More
Plastic Prototypes Using Silicone Rubber Molds
How-to, step-by-step instructions that take you from making the master pattern to making the mold and casting the plastic parts.
Read More
Moldmakers Deserve a Total Production Solution
Stability, spindle speed and software are essential consideration for your moldmaking machine tool.
Read More
Solving Mold Alignment Problems with the Right Alignment Lock
Correct alignment lock selection can reduce maintenance costs and molding downtime, as well as increase part quality over the mold’s entire life.
Read MoreRead Next

Efficient Maintenance Requires a Calculated Plan
Advancing from a mold repair culture to a mold maintenance culture can only be fully supported with a companywide understanding of what the real costs are and what the real potential savings can be.
Read More
Are You a Moldmaker Considering 3D Printing? Consider the 3D Printing Workshop at NPE2024
Presentations will cover 3D printing for mold tooling, material innovation, product development, bridge production and full-scale, high-volume additive manufacturing.
Read More
How to Use Strategic Planning Tools, Data to Manage the Human Side of Business
Q&A with Marion Wells, MMT EAB member and founder of Human Asset Management.
Read More